Adobe Premiere Rush (Pr)- Tutorial 2
Edit in Premiere Rush
Link to Assets: Download here
See our Copyright for Digital Media guide to help with sourcing open and/or free media to use.
Sample Video:
This guide has been designed for students of GEOP2040, however it can be used by anyone interested in gaining a good foundation in video editing with Adobe Premiere Rush.
Step 1 - Create your project
- For this project, you can use either Adobe Premiere Pro or Premiere Rush. For the Premiere Pro guide, click (here)
- Download the Assets linked (here) and put them in a folder on your computers desktop. Label the folder ASSETS.
- Open Adobe Creative cloud and find Premiere Rush, install it, and open the application.
- Close the blue tutorial menu
- Click the large blue ‘Create a New Project’ button
- Find location of assets. Ours should be on the desktop > select all assets by clicking on them individually
- Look at the bottom left and name your project > click on the gear and select 16:9 aspect ratio in project setup menu
- Click the blue ‘create’
 button on the bottom right
Step 2 - Getting to know Adobe Rush
- In Adobe Rush, just like Premeier Pro, the sequence is split into both multiple video and audio tracks. To toggle these tracks, click the 'Control Tracks' button
 . These tracks work in a similar fashion to layers. For the video tracks, assets placed on the higher tracks will appear above those on the tracks below. Options to 'hide', 'mute' and 'lock' tracks can be viewed on the left of each track.
 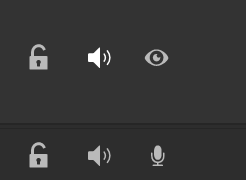 Note: In Adobe Rush, the maximum number of tracks is 4 for video and 3 for audio.
 - The assets we have just imported have appeared on the sequential timeline at the bottom of the application. If you want add further Assets to your project, just click the 'blue plus' button at the top left and select the assets from your computer, and click 'add'.
- Here you are able to re-arrange the order of the assets by clicking and dragging them.
- To extend the length of a clip, move your cursor to the end of a clip and when you see the yellow bracket with an arrow in it, click and drag.
- To cut a clip, select the relevant clip and click on the 'cut'
 button at the bottom left.
 - To duplicate a clip, select the relevant clip and click the 'duplicate'
 button at the bottom left.
 - To delete a clip, select the relevant clip and click the 'delete'
 button at the bottom left.
 - To zoom in or out of the sequence timeline, click and drag the dots on the end of the sequence slider at the bottom.
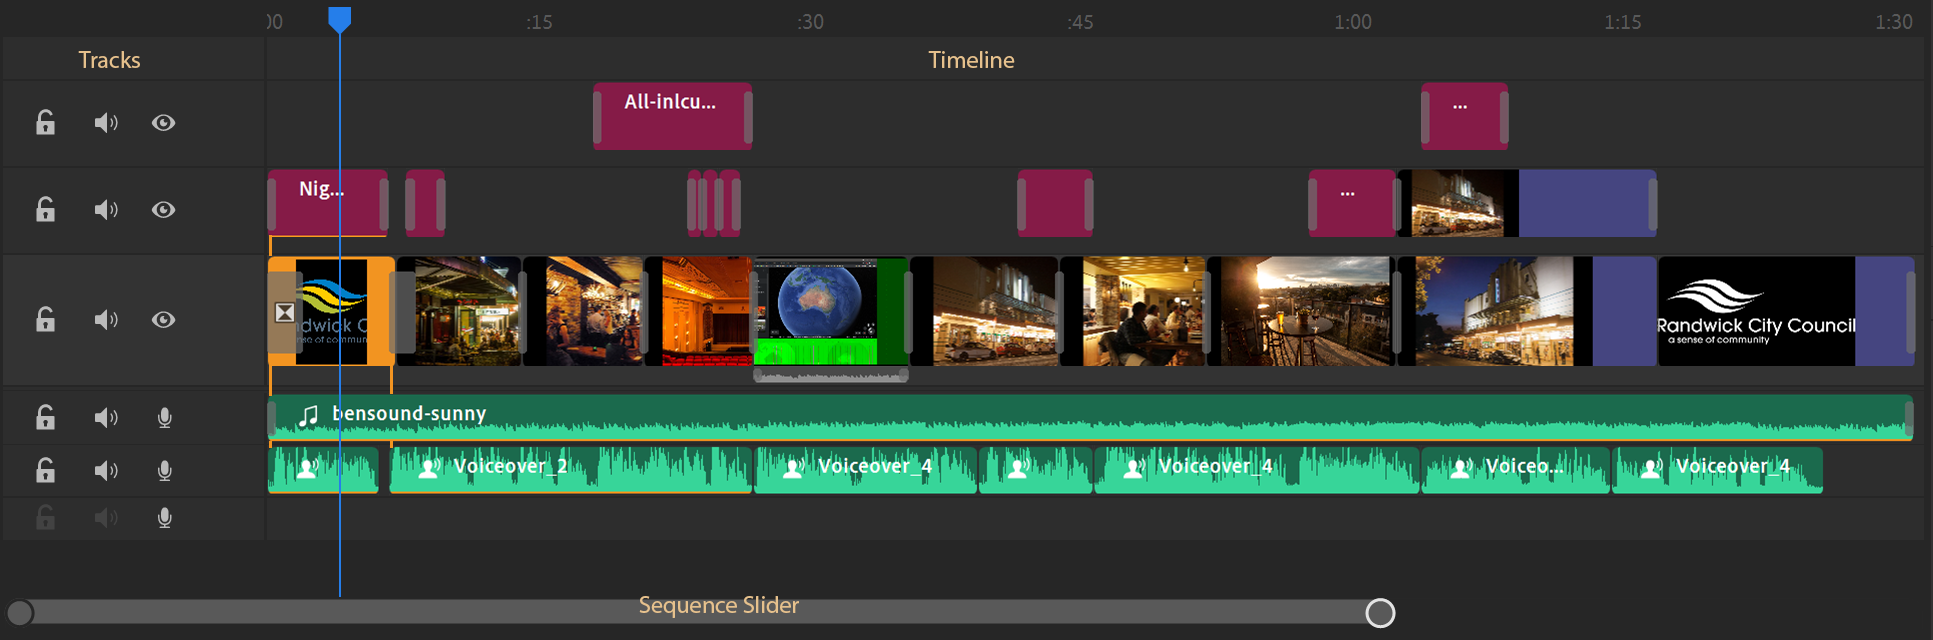
- On the right there are 6 buttons that each provide different settings for the function of your clips. These will now be discussed in relation to the Assets used.
Step 3 - Recording and Editing Audio
- To record audio, make sure you have plugged in a microphone, or if you do not have one, make sure you computer has one
- As we previoulsy imported all out assets, the mp3 song should appear in the first audio track
- To record audio, click on the 'microphone'
 to target track two for recording.
 - The microphone will then turn into a 'red' record button
 . Clicking this will start a countdown from three, after which all audio spoken into a microphone will be recorded.
 - Editing audio clips is very similar to video clips. You can click and drag audio clips to move them around the sequence and edit the length of them. The duplicate, cut and delete buttons can also be used.
- Select your desired audio clips and click the 'audio'
 settings button on the right.
 - This opens up a tab that alllows the volume, balance, and enhancement of audio clips. For the music clip, I changed the volume to 45 and selected 'auto volume'.
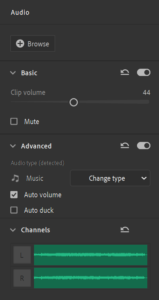
- For my recorded audio clips, I set the volume to 70, selected 'balance sound', 'reduce background noise' and 'reduce echo'.
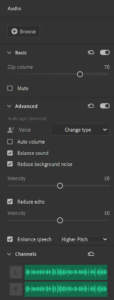
- Make sure that for the music, the 'audio type' is detected as 'music', and for voice, it is detected as 'voice'.
- In this example, I recorded the audio in sections and then trimmed each clip to the desired length.
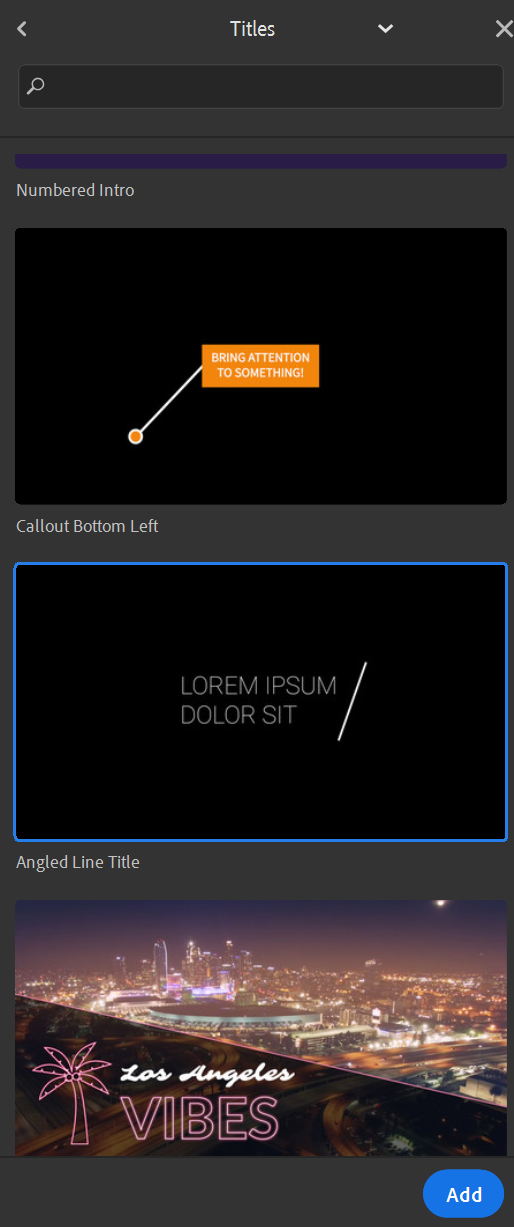
Step 4 - Using Graphics
- The first setting tab on the right is the 'Graphics' tab
 . Clicking 'Graphics' > 'Add Graphic'
 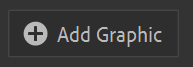 opens a menu on the left which allows pre-made titles, transition graphics and ovedrlays to be clicked and dragged into the work space. Clicking 'more' will enable more graphics to be accessed.
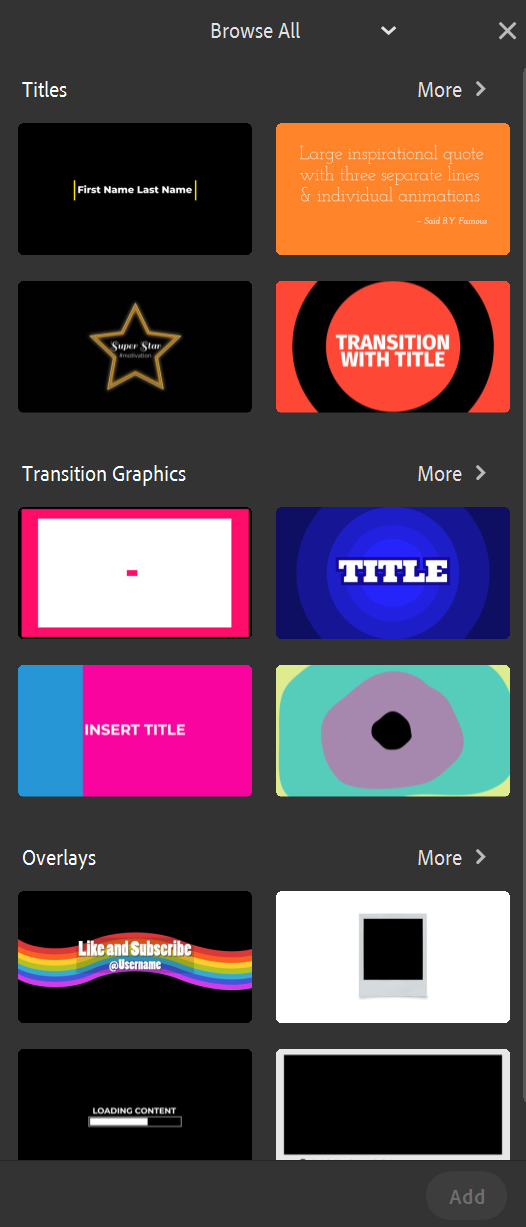
- You can drag a transition onto any section of your sequence, where it be dropped into the lowest possible layer.
- To edit the text of a tranistion, click on the sequence module and click on the drop down menu on the right that displays the text. This will now select the text on the preview module and allow you to edit the text.
- Within the drop down menu on the right, there are other settings that allow the edit of text colour, background, font and font size as well as other options.
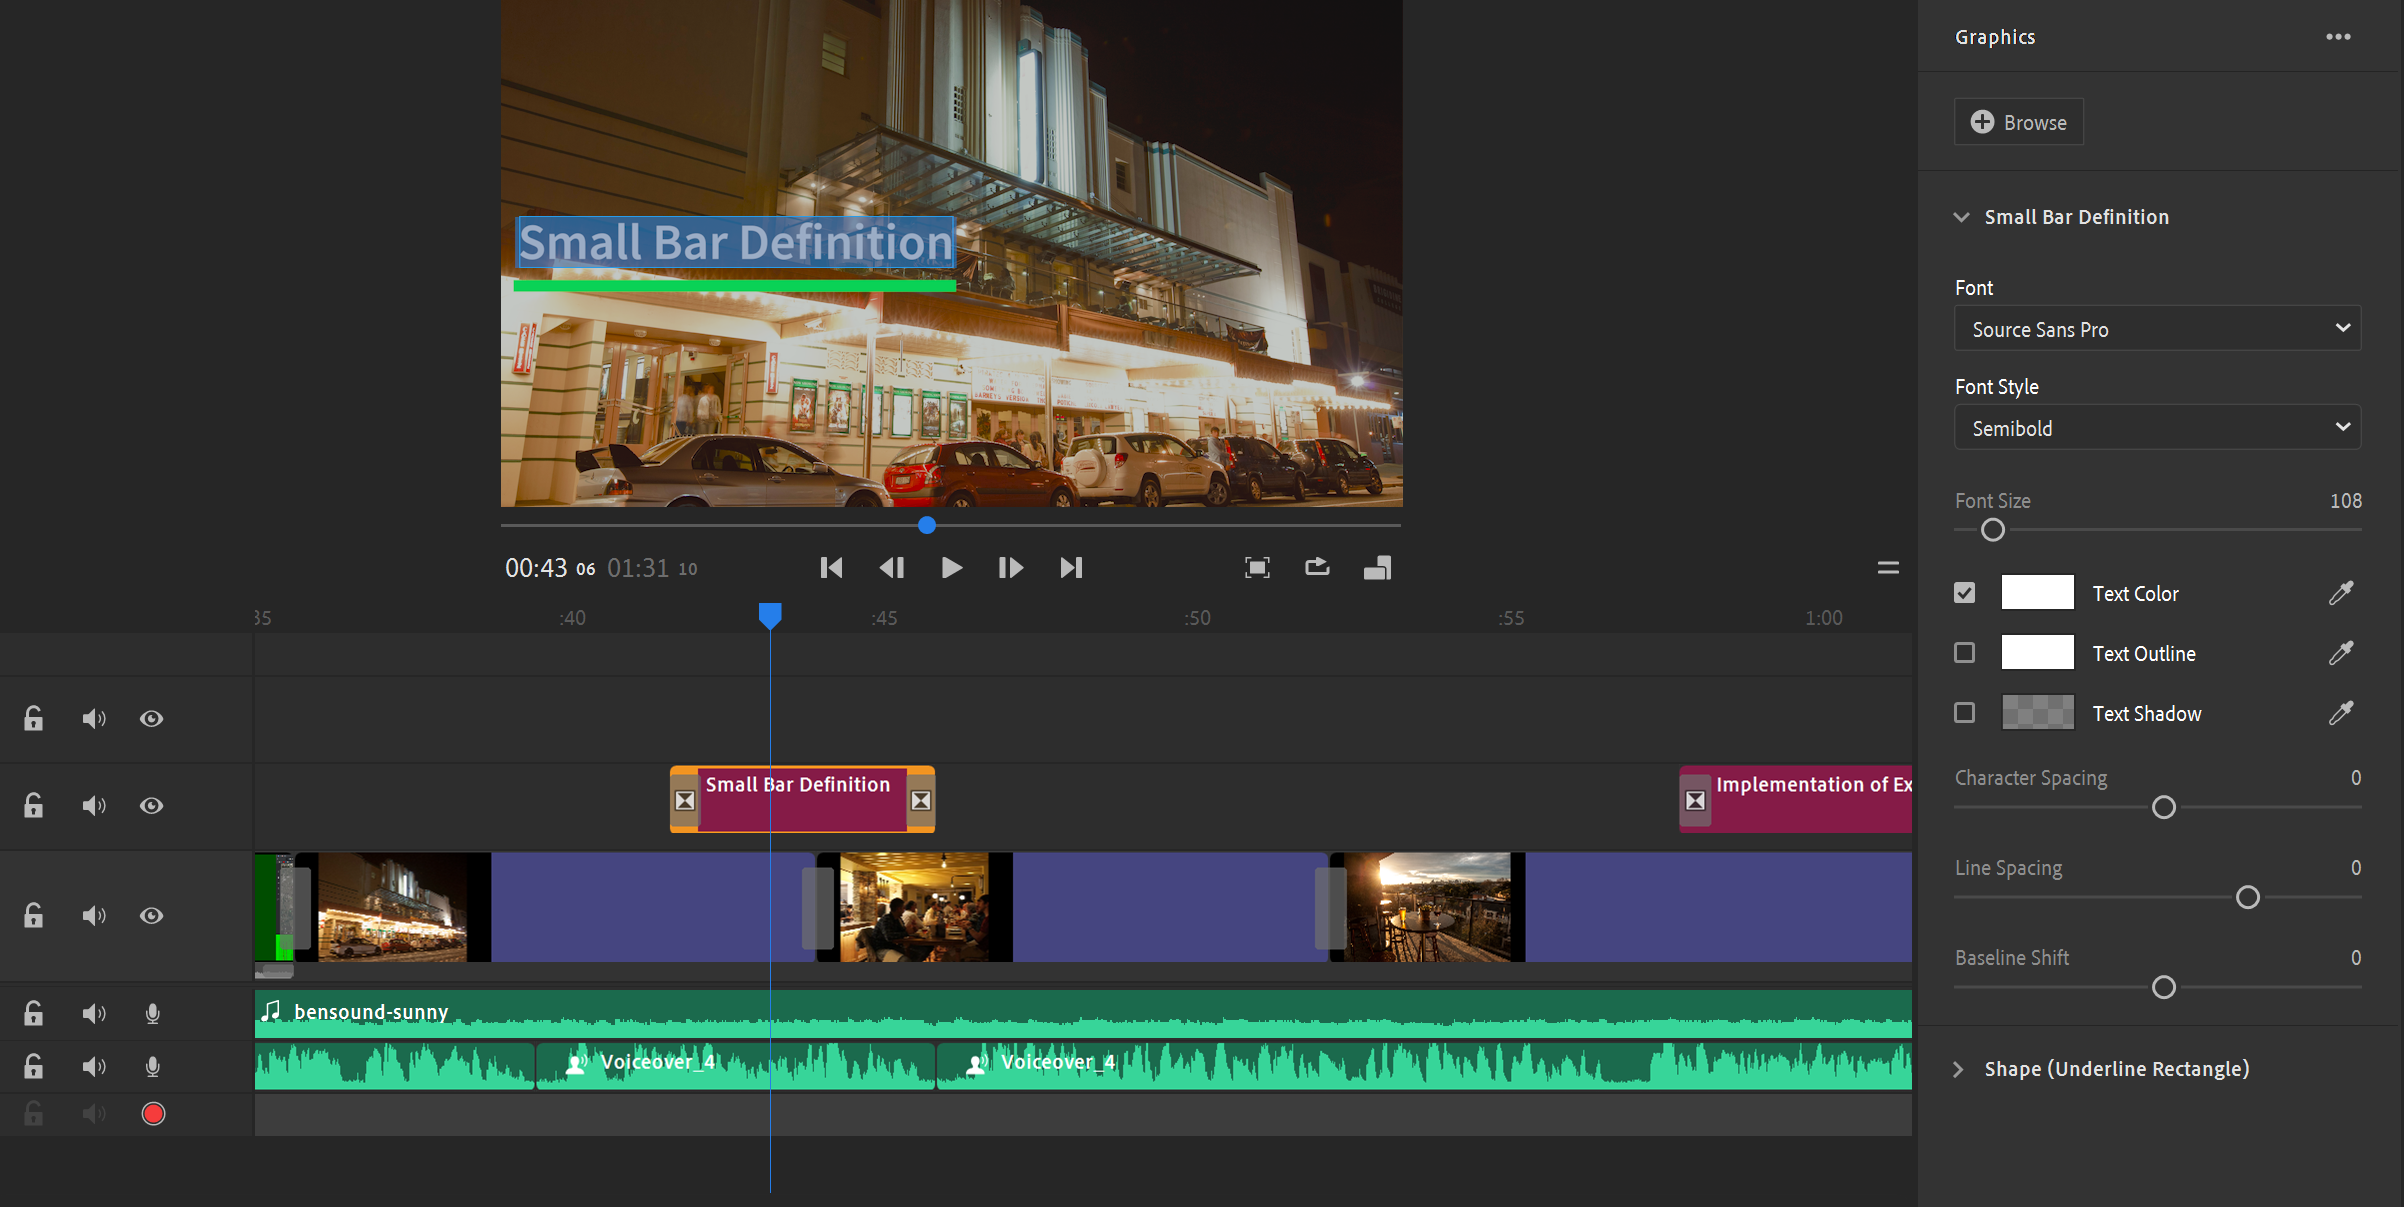
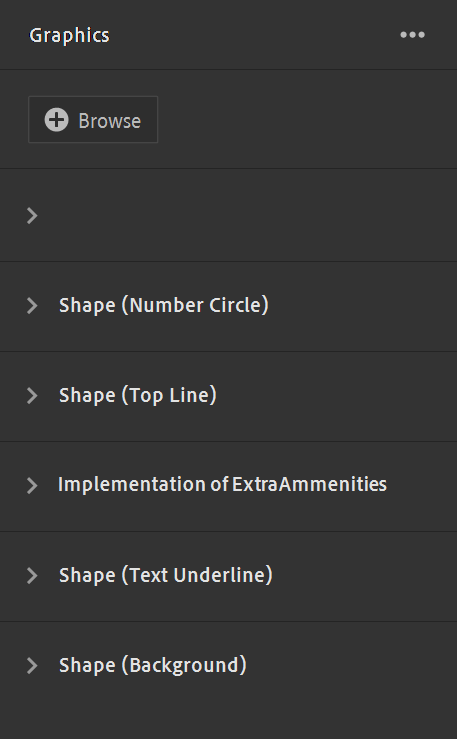
- Note: Some transitions, graphics and titles, with multiple text boxes, have separate menus for editing the different sections of text.
- Clicking on the preview module will bring up a box which can be used to make the graphic smaller or larger, and clicked and dragged to move it around the workspace.
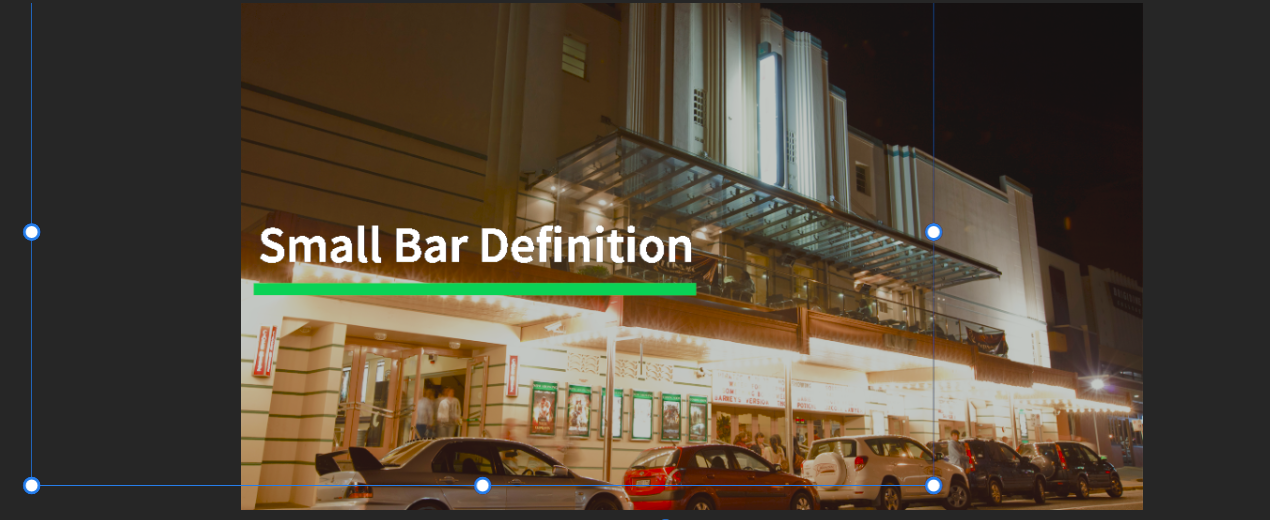
- We will now inlcude a graphic in from the 'Titles section'. The one I have chosen is the 'Angled Line Title'.
- I used this title in conjunction with the Randwick City Council coloured logo. After clicking and dragging the title onto the sequence (you can also click the blue 'Add' button), click the text menu on the right and edit the text to Night Time Economy Study. You may need to start a new of text line (press enter after 'Night Time'), in order to make the graphic work properly.
 With the title selected, open the menu and change the settings to reflect the same theme as the Randwick logo.
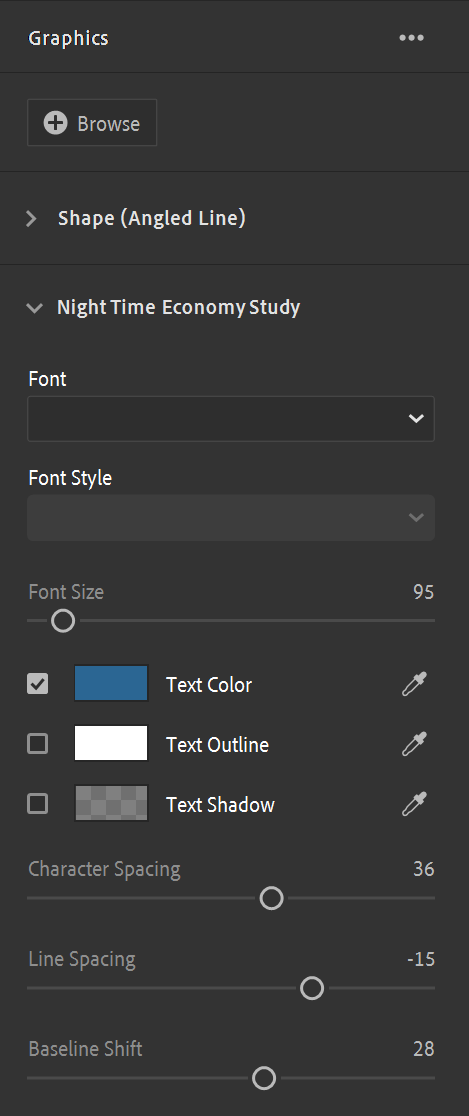
- Note: as with most Adobe programs, you can use the 'dropper'
 tool to colour match the blue Randwick writing with your new title. To do this, select the title text, click on the dropper and then click again on the desired colour in the preview.
 - You now have a title that can be edited in the sequence in the same manner as all other assets discussed. There are hundres of 'graphics' to choose from, which should well a truley cover all required needs (quotes, dot points, labels etc.).
Step 5 - Effects
- The second button on the right deals with 'Effects'
 that can be added to video clips, grahics and audio.
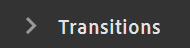
 - Click on the clip, select the ‘effects’ button on the right, click 'Transitions'
 and then choose a transition. A transition (can be determined as a grey box) will be automatically added to the start and beginning of the clips/graphics.
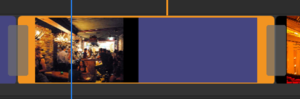
- I have used the 'dissolve' transition for the majority of the assets in this video as it provides a smooth transition.
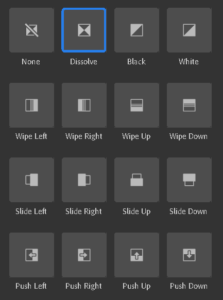
- To quickly add a previously selected transition, the Windows keyboard shortcut Crtl + D (Command + D for Mac users), can be used with the desired asset selected.
- Individual effects can be deleted by clicking on the grey effect on the clip and pressing the delete key on your keyboard.
- The 'Duration' slider
 in the 'Transitions' menu allows the duration of the effect to be changed.
 - The other two option in the 'Effects' menu are 'Pan and Zoom' and 'Auto Reframe'. Pan and Zoom can only be used on pictures. Select a picture in your timeline and click on the 'Pan and Zoom' drop down menu. This will bring up two boxes that can be manipulated to produce a start and end for the zoom within the picture.
- 'Auto Reframe' is used for videos and will automatically keep the clip framed evenly within the video.
Step 6 - Colour edits
- Preset filters can be added to pictures and videos under the 'Colour' button
 on the right and choose a filter. For the two pub images I chose the 'Airy filter' to give the images a cosy feel.
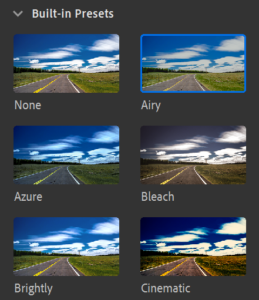
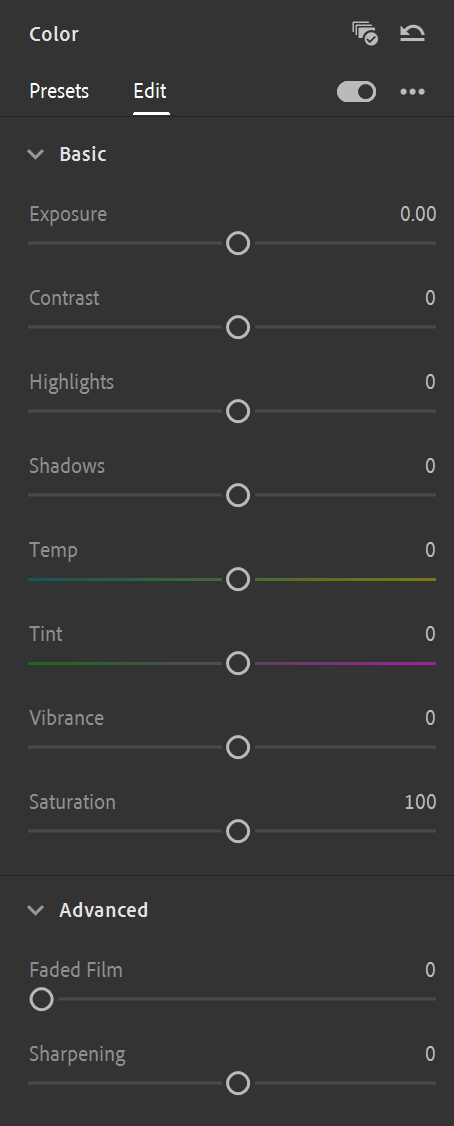
- Selecting the 'Edit' button up the top will allow you to manually edit the colour properties of an asset.
- At the bottom of the 'Presets' menu is a slider that allows changes to the intensity of the filter.

- Clicking the 'three dots' in the top right of the menu allows for the creation of a custom 'Preset' using the edit menu.

Step 7 - Clip speed
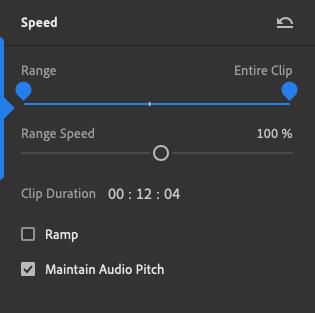
- The 'Speed'
 menu enables you to edit the speed of an entire video clip or a section of a video.
 - The blue 'Range' and 'Entire Clip' slider acts as a demonstrtaton of the entire clip. Dragging these sliders will speed up the relevant sections of a clip.
- Moving the grey ‘Range Speed’ slider changes the speed of the clip (clicking on the percentage and typing in the desired number also works)
- The 'Ramp' option, when ticked, will ramp the speed of the clip smoothly. When unticked, the speed of the clip will jump from one speed to another.
- 'Maintain Audio Pitch' is an option that allows for the rlevant increase or decrease to pitch of the clips in relation to the speed of clip.
Step 8 - Crop and Rotate
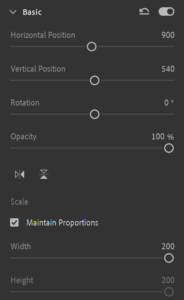
- The last editing menu in Adobe rush is the 'Crop and Rotate' button
 .
. - With the desired clip or image selected, the 'Basic' section of this menu provides tools to manually manage the poisition of an asset within the preview screen. Using the sliders, the position, rotation and opacity of the asset can be manipulated.
- Once positioned correctly, play around with the 'flip vertically' and 'flip horizontally' buttons
 that will change the view of the assets.
 - Under 'Basic' the scale of an asset can also be changed using the 'width' and 'height' sliders. Selecting the box 'maintain properties' will allow the change of both sliders concurrently.
- The 'Advanced' section of this menu allows the crop (using the sliders) or assets. Play around with the sliders.
- A small eidtorial tool called 'Feather' is available under the 'Advanced' tab. This provides a feather tot he borders of selected assets.
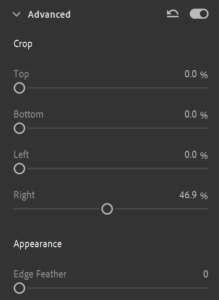
- It is possible to crop half an image, re-position it (using the 'Basic' 'position' sliders), allowing for another image to be placed next to it. To do this, choose two assets and place one above the other on two sperate video tracks.
- Set the left crop of one image to 50 percent and the right crop of the other to 50 percent. You now have two images sharing the same preview screen.
- You can play around with the position and crop sliders to create unique edits.
Step 9 - Exporting your Project
- After you have completed all edits and are happy with your project, it is now time to export the video.
- To export, click the 'Share'
 button at the very top left of the program (Or go to File > Share)
 - The Share menu should now be open. Choose and give you project a file name.
- Clicking on the folder to the right of 'Save to...' will allow you to choose a destination on your computer to save the project.
- On the right of this menu will be a preview screen which will allow you to watch your project as a final exported video.
- Clicking on 'Advanced Settings' will drop down a menu housing settings to customize the overall export quality of your video. If uploading this video to YouTube, you can select the relvant settings from the 'Preset' drop down menu.
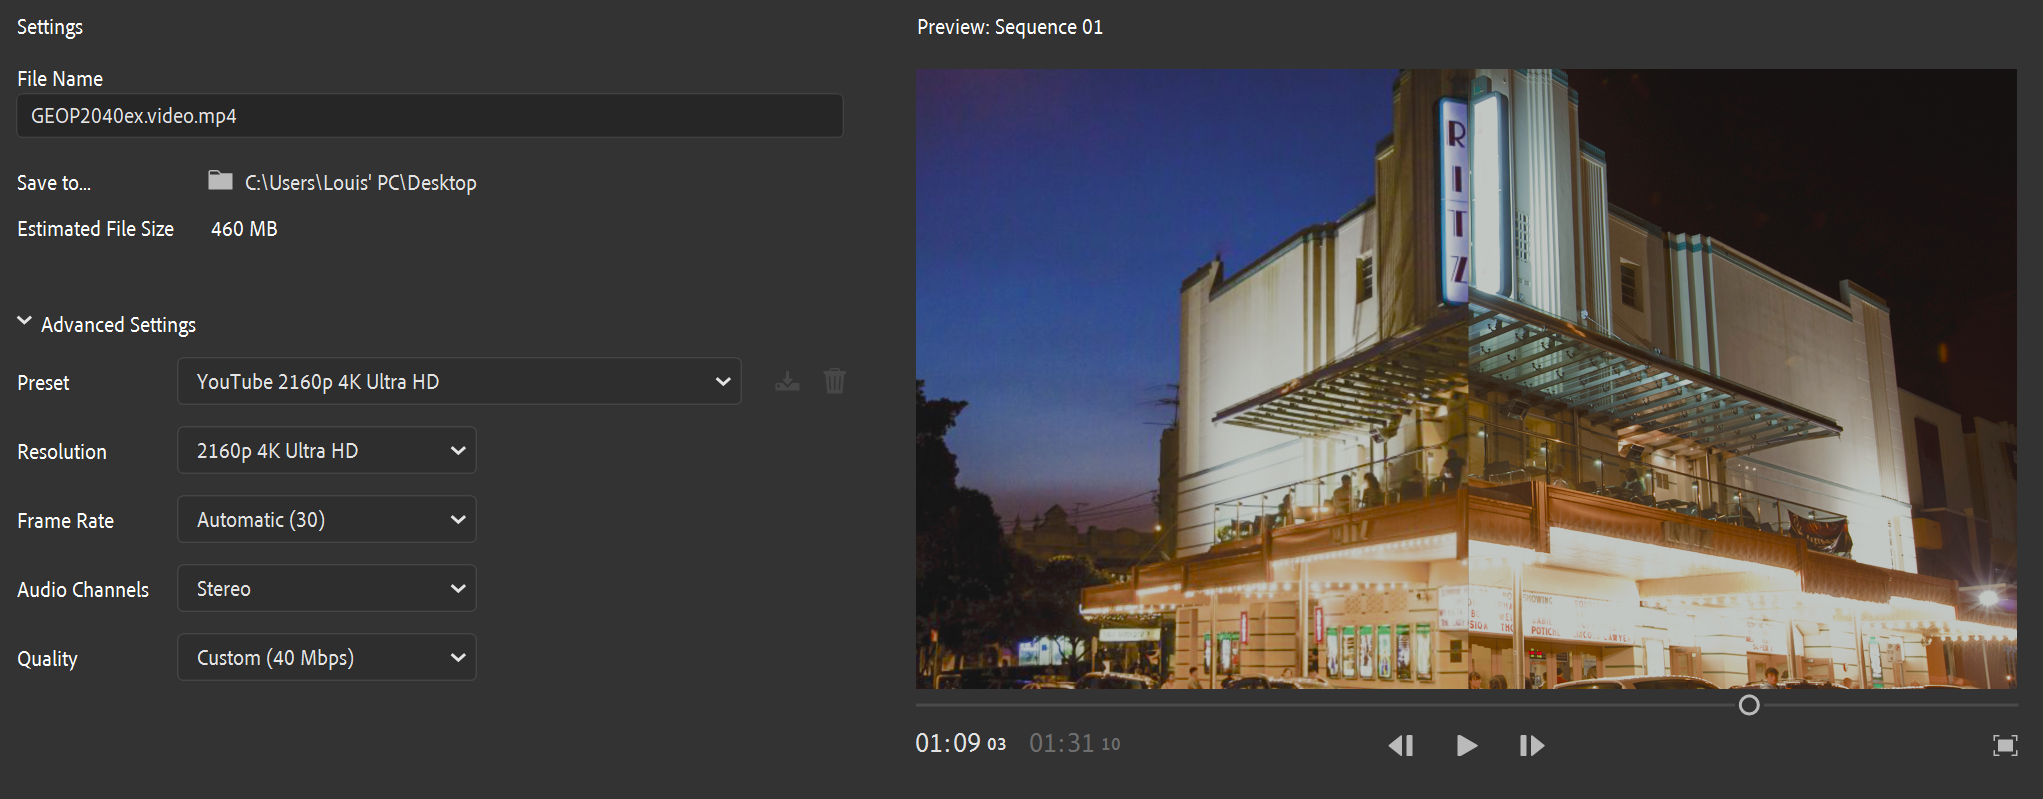
- When your settings have been finalised, click the blue 'Export'
 button at the bottom right. After the video has been exported, click the blue 'Done' button and you can now close Rush.
 - If you want to upload your video to YouTube and embed it within an Adobe Portfolio website you can learn how to do this in Step 5 here.
Virtually all the features of Adobe Premier Rush have been covered within this guide. A couple examples have been given on how to create different effects with the tools provided. This program is not difficult to understand, and basic edits can be achieved with even smallest technical knowledge. Give the program a go and experiment with the features offered.