Adobe Photoshop (Ps) - Tutorial 4
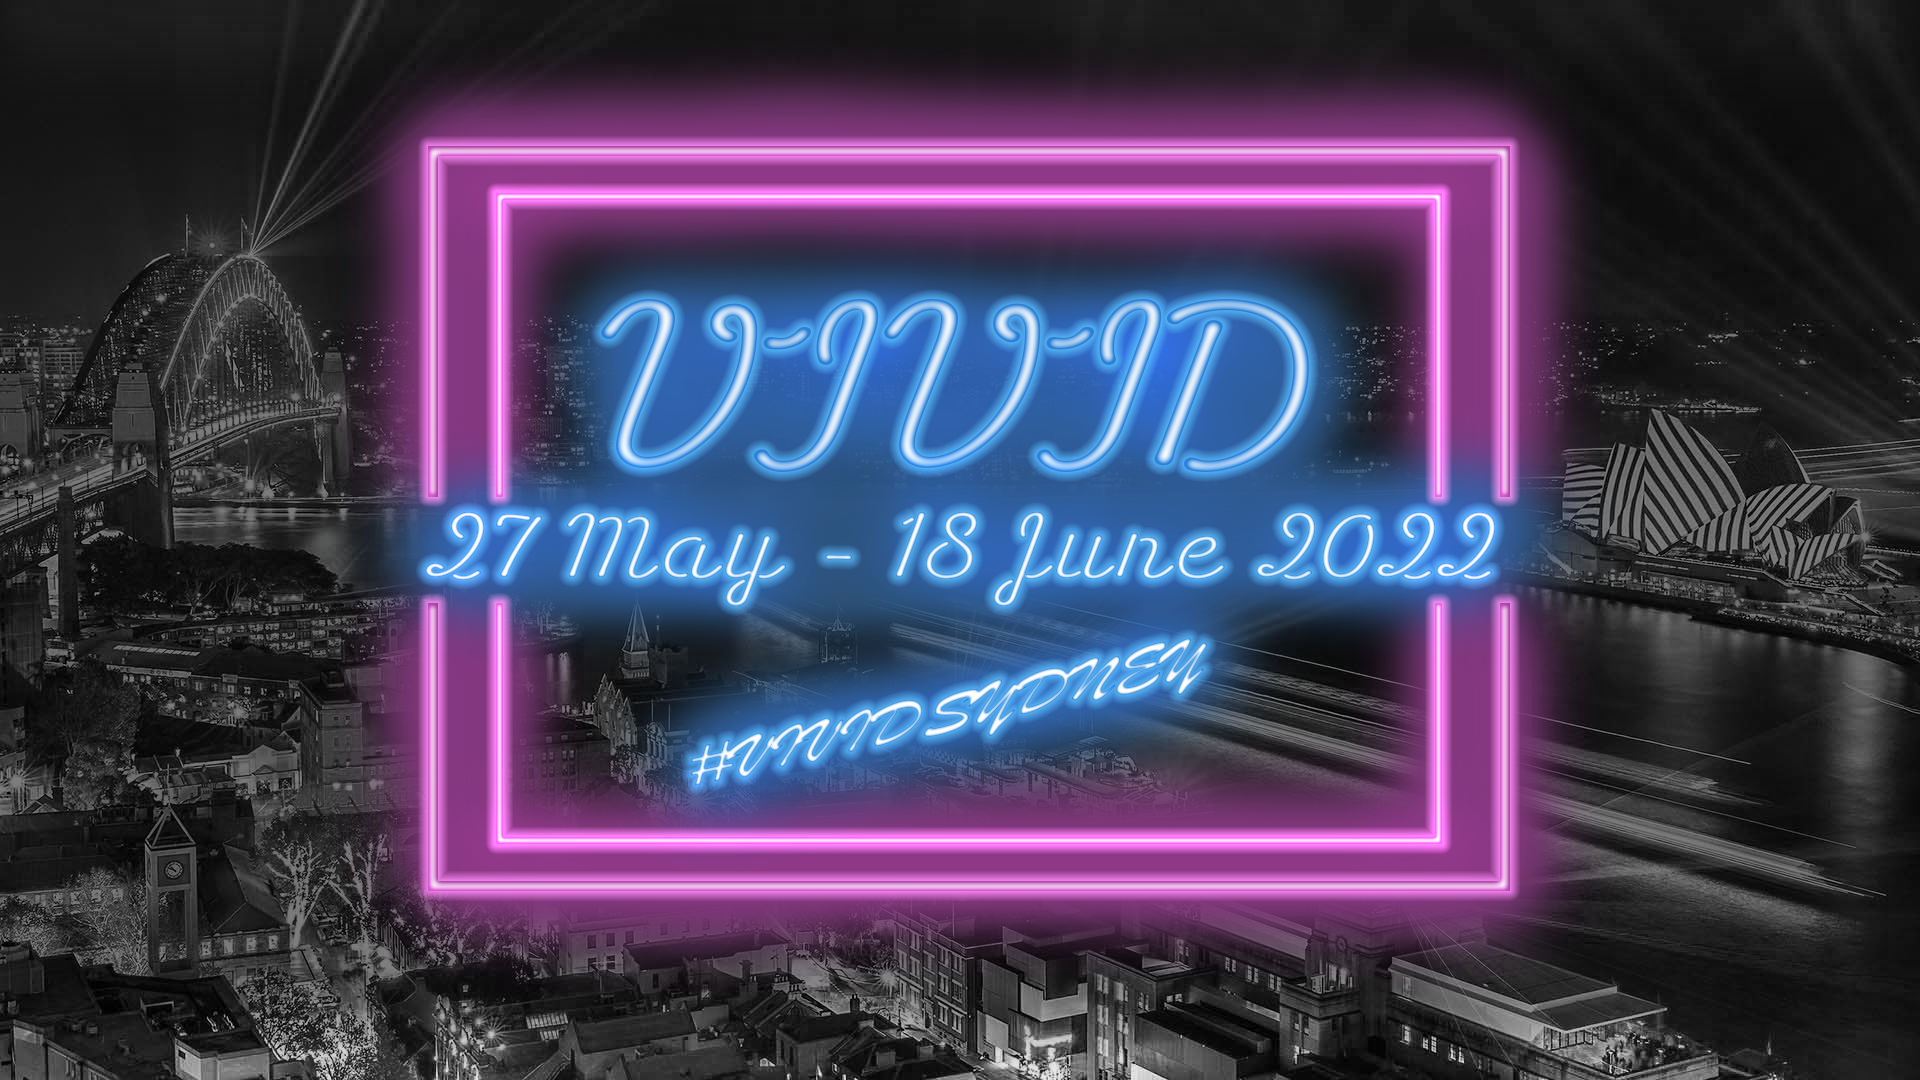
Vivid 2022 Poster
Difficulty: Advanced
What you will learn: Creating a neon poster for Vivid Sydney
Downloads:
SydneyHarbour Image
Download the ‘HT Neon’ font here. Select the slider to activate it. You will be prompted to log into Adobe Creative Cloud. This font will now appear in your font list for all Adobe Products.
Step 1 - Getting Started
- Download and save the image and font linked above.
- Open photoshop and click New File, Default Photoshop Size, Create
- File > Open and select the Sydney Harbour Image. Close the white default tab.
- With the image layer selected press Ctrl + Shift + U to desaturate the image.
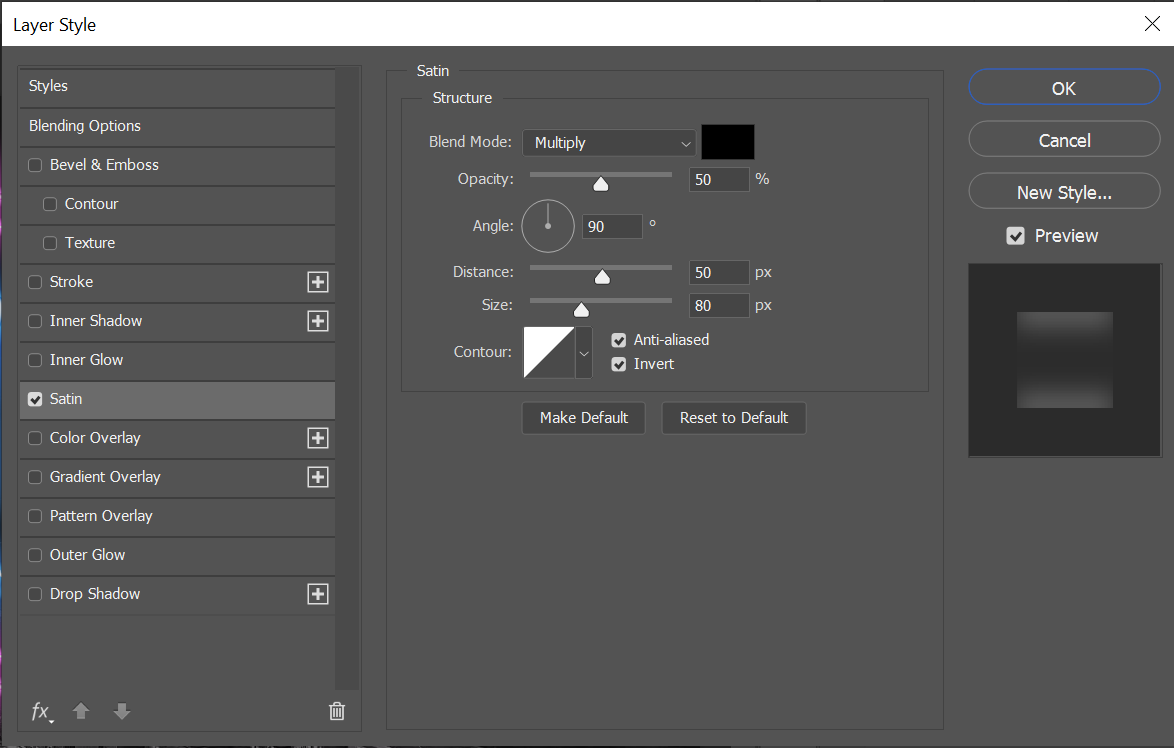
- Double click on the image layer and the 'Layer Style' menu will appear. Tick the 'Satin' box, this will apply a satin filter to the image, making our neon text stand out more. Click 'ok' to confirm.
- Go File > Save As to name and save your project.
Step 2 – Creating text layers
- Enter the text tool by pressing ‘T’ or selecting the button on the left tool panel
 . Select the ‘HT Neon’ font we just downloaded. Click on the image where you want to add text. We will be writing three lines of text (Font, Colour, Size),
-
- VIVID (HT Neon, White, 72 pt)
- 27 May – 18 June 2022 (HT Neon, White, 72 pt)
- #vividsydney (Brush Script MT, White, 72 pt)
- Selecting all three text layers (Ctrl+ click), press the ‘centre align’ button at the top
 . Using the mover tool (V)
  to a position within the image. I have placed it in the centre, using the pink grid lines to align it.
 - To adjust the size of the text boxes, with the desired layer selected click on the ‘transform’ button at the top
 .
. - Right click the #vividsydney layer and select ‘skew’. Holding ‘alt’, skew the text by dragging the box points.
Step 3 - Drawing Rectangles
- Select the rectangle tool (U)
 , and change the fill to nothing, the stroke to white and the size to 5px.
 - Draw a rectangle and position it so it sits evenly bordering our text.
- With the rectangle layer selected, hold Ctrl + Win (Cmd) + J. This will copy the rectangle layer. Next press Ctrl + Win (Cmd) + T which will enable you to re-size this new rectangle. Holding Alt will allow you to resize it uniformly. Make another rectangle that borders the previous. Make the stroke size 8px.
- Optional: If you wish to have the same box-cut effect, make your second line of text overlap your rectangle borders. Then select both rectangle layers and click on the ‘mask’
 button at the bottom of the layer menu. Draw a rectangular marquee
  around the middle line of text. Make sure the colour selection is black, and click on each mask and press Alt + Backspace.
Step 4 - Adding the Neon glow effect
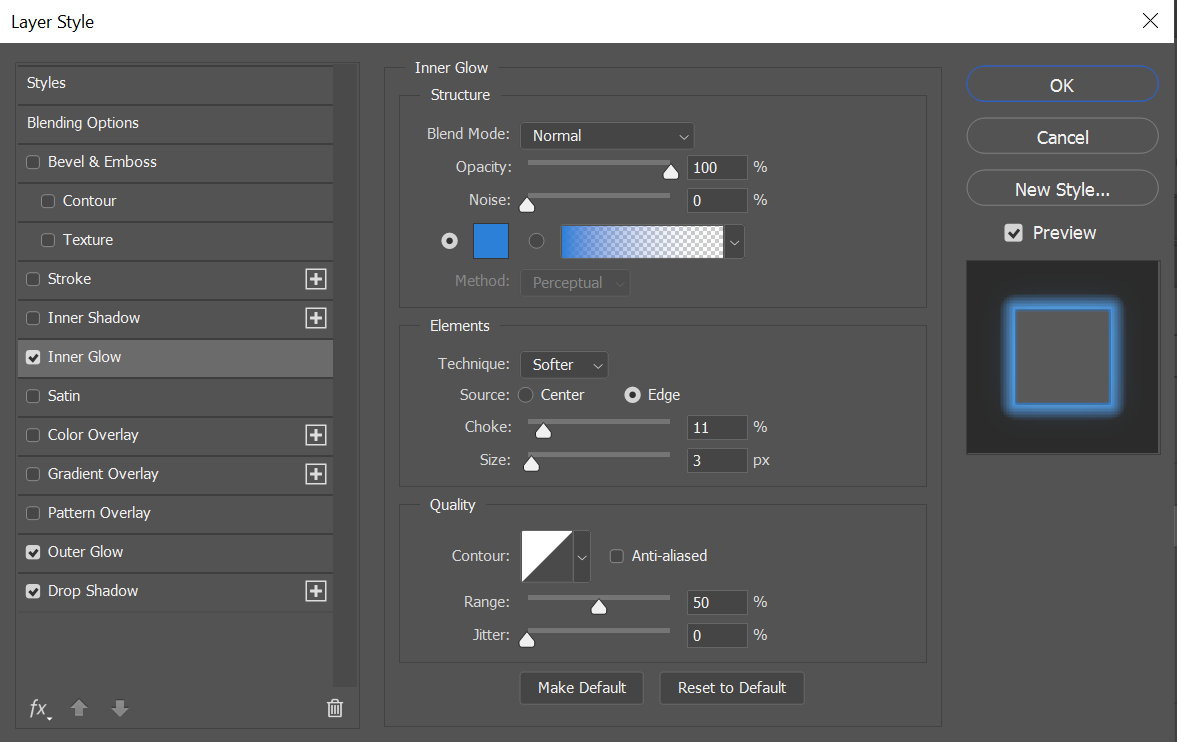
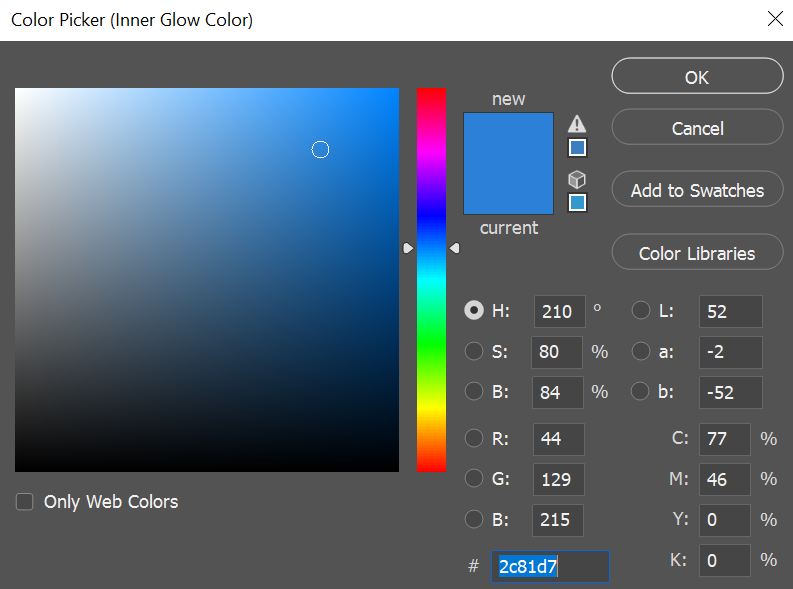
- In the layers tab, double click on the first text layer. This will bring up the 'Layer Style' menu. Select and tick 'Inner Glow' and change the settings as seen here. You can choose another colour and change the general specifications as you please.
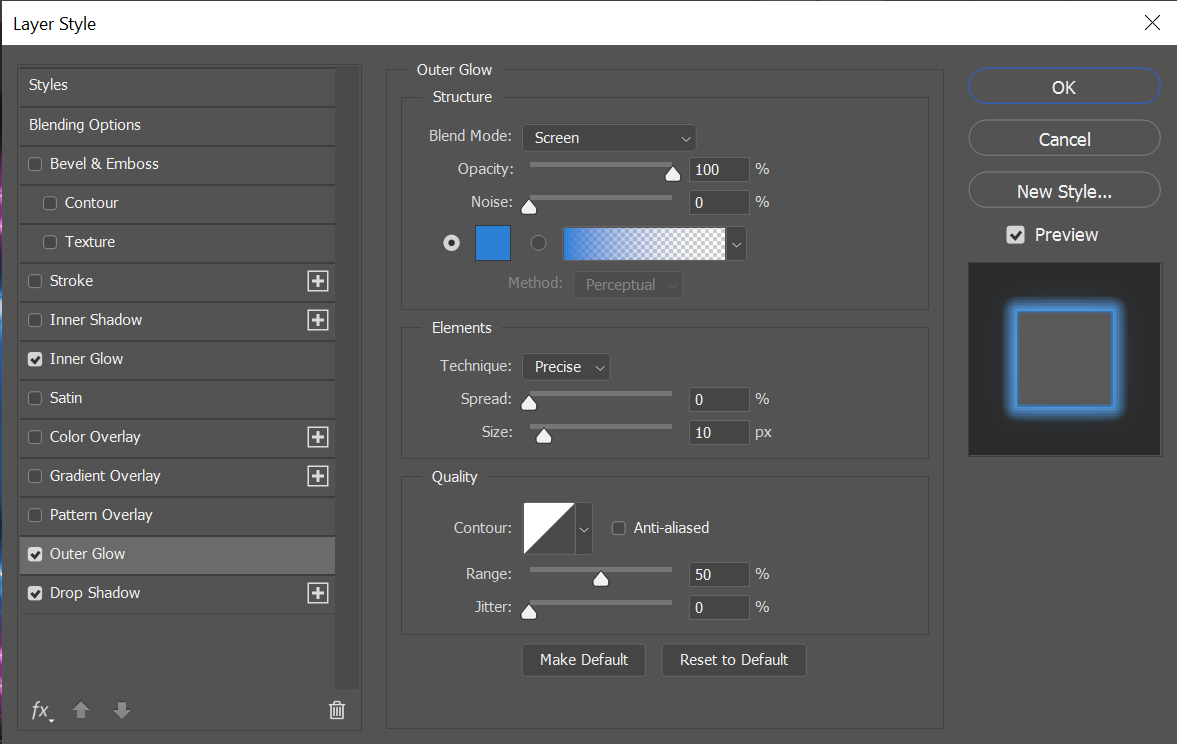
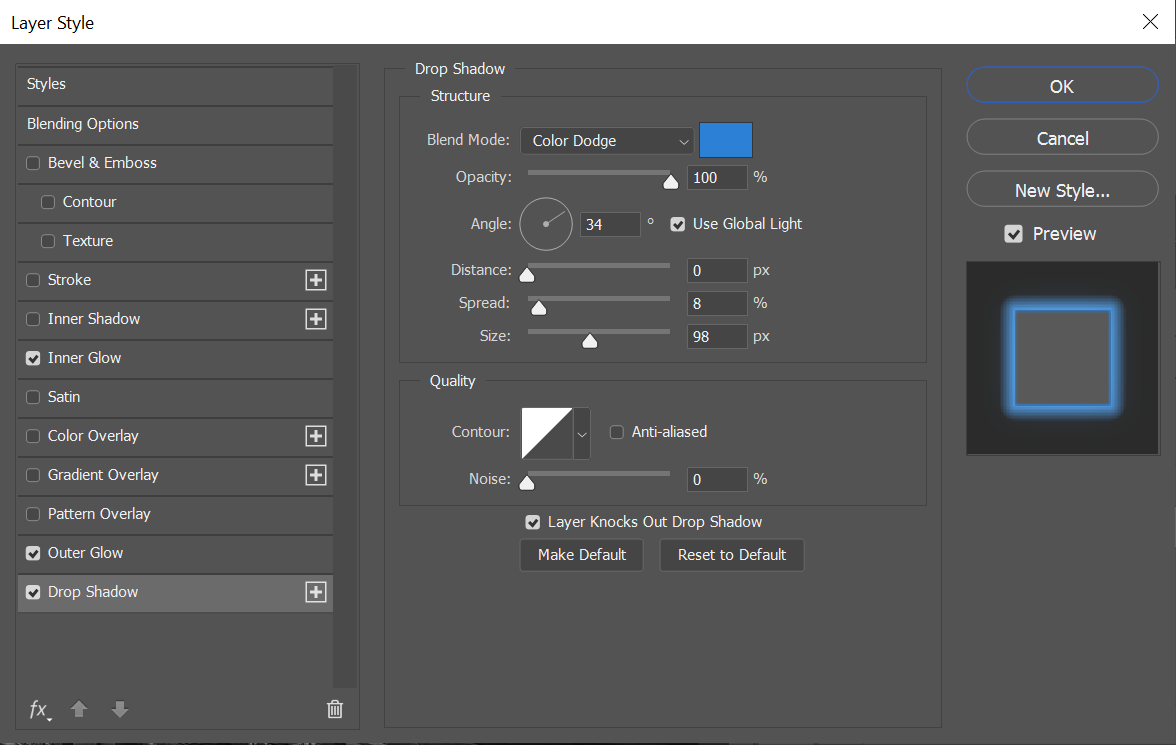
- Repeating step 1, add an 'Outer Glow' effect as well. Used settings are seen here.
- Note: Clicking on the 'Inner Glow' colour palette, you can copy the colour code over to 'Outer Glow' in order to maintain the same colour.
- Add a 'Drop Shadow' effect making sure to use the same colour.
- Holding Alt, click and drag the 'Effects' from your 'VIVID' layer onto the other two layers of text.
- Repeat these steps for the two rectangles. I have made both rectangles a different colour to the text.
Step 5 - Adding a glow brush
- Press 'B' to select the brush tool
 . Clicking on the brush size will allow you to change the size and hardness of the burhs. Change the size to roughly 150-170. Make sure 'Hardness' is on 0%.
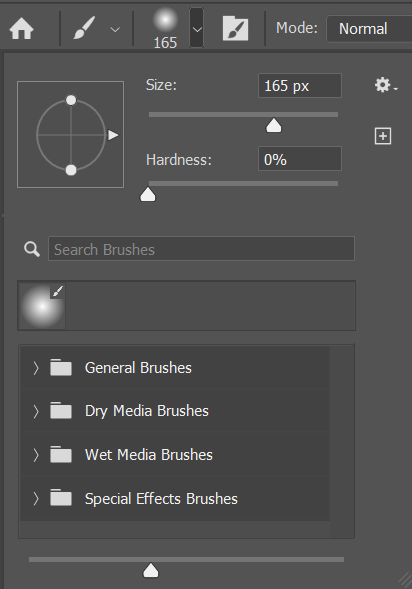
- Whislt holding Alt, click and hold, bringing up the colour dropper. Hover over the blue text and select a shade of blue you are happy with. With the brush tool still selected, paint over the blue text, creating a the look of a neon glow. You can apply as much as you want, but I just did a cursory layer over the text. You may need to have the background image layer selected when you do this.
- Repeat these steps for the pink rectangles, making sure to use the colour dropper on the pink.
Step 6 - Export final file
- Save your work as a .psd master (File > Save) so you can come back and edit the layers later.
- Go to the option bar at the top of the screen and select File > Export > Export As. This will cause an export popup to appear.
- Ensure that File Settings > Format is set to JPG. Leave other settings to default. Next click Export.
- Name the export and save the JPG export to your hard drive.
- And you’re done! Awesome work!
Originally developed by Louis Anderson, April 2022