Adobe Premiere Rush (Ru)- Tutorial 1
Basic Edit in Rush
Difficulty: Baisc
What you will learn: Create a project in Premier Rush, Import media, Edit using a variety of tools, Export finished standalone media file
Download these files: Clips for tutorial (192 MB)
(pexels.com, freestockmusic.com)
The final product will look like this:
Step 1 - Create your project
- If you haven't already, Open the link Clips for tutorial (192 MB) and unzip the file.
- On your desktop, right click and make a new folder and name it ASSETS. Move the files you unzipped into this folder.
- Open Adobe Creative cloud and find Premiere Rush and open it
- Close the blue tutorial menu
- Click the large blue ‘Create a New Project’ button
- Find location of assets. Ours should be on the desktop > select all assets by clicking on them individually
- Look at the bottom left and name your project > click on the gear and select 16:9 aspect ratio in project setup menu
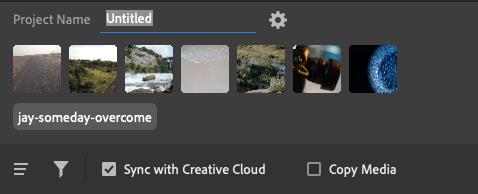
- Click the blue ‘create’
 button on the bottom right
Step 2 - work with drone Footage
- Move the blue track head to a section (about 5 seconds in) of the first clip and click the ‘cut’
 button on the bottom left
 - Select the section of the clip you wish to delete, click on the ‘delete’ button
 on the bottom left
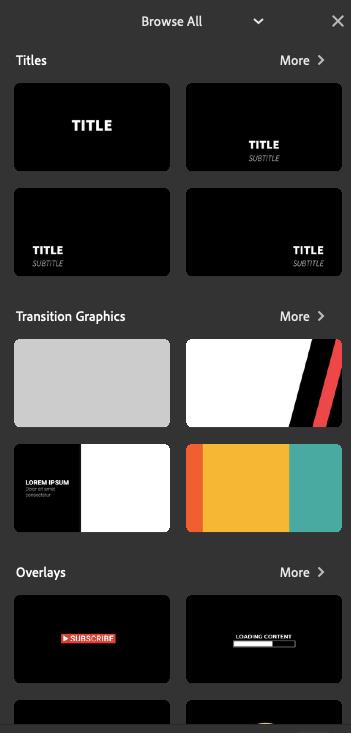
 - Click on ‘graphics’
 (the top button) on the far right, then click ‘add graphics’
 - On the left, choose an ‘overlay’ and drag it into the workspace.
- At the very bottom left click the ‘control tracks’
 button.
 - This new popup allows you to toggle different video and audio tracks. Drag your overlay to a track above the footage.
- Extend the overlay to cover the majority of the footage.
- Click on the right edge of the footage, select ‘effects’
 button on the right and choose an effect (I chose ‘white’)
Step 3 - edit river footage
Here we will add a transition graphic and colour correct the video
- Select the footage and click the ‘colour’
 button on the right. select the ‘edit’
  tab at the top of the panel.
 - Click between this clip and the next clip (the one of the monk) and play with the settings to try and match the colours of both videos. Matching the colours will allow for a smoother transition.

- Next, we will add a graphic transition
- Select the footage and click the ‘graphics’ button on the right. Click ‘add graphic’
- Click the ‘more’
 button for ‘transition graphics’. Select the 3rd transition > drag it into the project above the river clip. Click the text to edit it
 - Add another ‘transition graphic’. choose one of the colourful ‘transition graphics’ and drag onto workspace in track above. Extend transition over the two clips
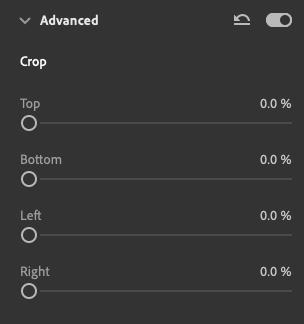
- With the transition selected, click the ‘crop and rotate’ button on the right and drag the ‘right’ crop bar until the white is no longer seen. Drag the transition to desired length
Step 4 - edit monk footage
- Click onto the footage and click the ‘speed’ button on the right. Drag the right blue slider to just under halfway.
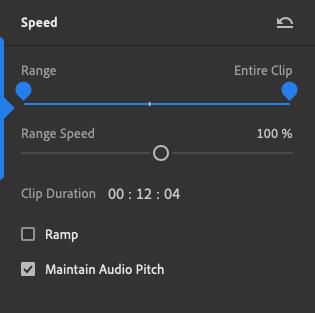
- Move the grey ‘range speed’ slider to ~395% (clicking on the percentage and typing in the desired number also works)
- Test the clip, making sure that the monk walking is sped up, and returns to regular speed when he faces the camera
- Open the ‘crop and rotate tab’ and adjust settings and click the ‘fill’ button

- Drag the video so that the monks face can be seen on the screen
- Click on the right of the footage and add a ‘slide’ effect from the ‘effects’ tab
Step 5 - edit camera and liquid footage
- Split this footage at around the halfway mark.
- Drag the blue liquid footage to a new track above right split clip and drag the ends of the liquid footage to line it up with the camera footage
- Add a ‘dissolve’ effect to the start of both the liquid and right camera clips
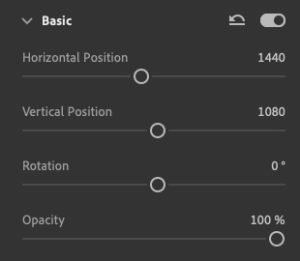
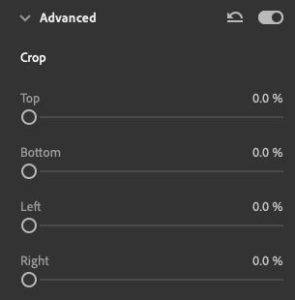
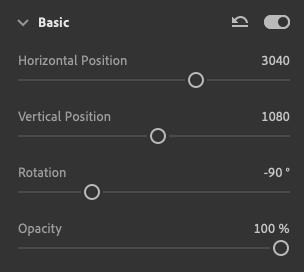
- Click the liquid footage and bring up the ‘crop and rotate’ tab and change the ‘basic’ and ‘crop’ settings to these shown:
- Bring up the ‘color’ tab and play around with the options
- Click back to the right split camera footage, and click on the ‘colour’ tab, but look at the ‘presets’
 and select ‘mono’
 - Try and match the two clips in tone and colour using the 'presets' or open the 'edit' menu and have a go at manually editing the clip colour
- On the end of both clips, add a ‘dissolve’ effect
Step 6 - edit beach footage
- Click on the beach footage and find the ‘speed’ tab
- Drag both blue sliders to a section in the middle of the ‘range section’
- Set ‘range speed’ to 400%
- Click the ‘ramp’ box and drag the grey slider to 0.5s
- This will give us a smooth transition between the sped up and regular sections of the footage
- Add a ‘slide right’ effect to the end of this clip
Step 7 - edit car footage
- Click on the clip and drag the blue view pointer to a section of the clip you want to cut and find the 'cut' button on the bottom left (I cut about 5 seconds of the car driving slower)
- Select the smaller of the two videos and click the 'delete button' at the bottom left
- Find and click the 'duplicate' button. Repeat this until you have four of the same clip
- Click the ‘control tracks’ button and drag and arrange the clips so that they are on top of each other
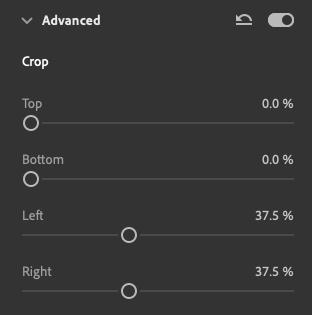
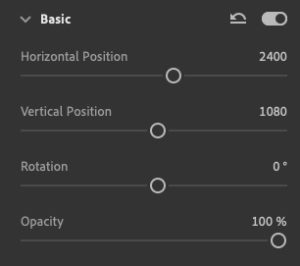
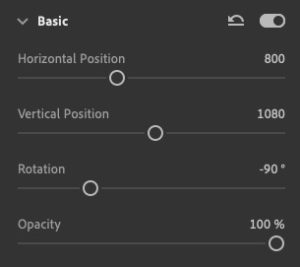
- From top to bottom, change the crop and position settings of each video as shown here:
- 1st: Add a ‘slide down’ effect to both ends of the clip
- 2nd: Add a ‘slide up’ effect to both ends of the clip
- 3rd: Add a ‘slide left’ effect to both ends of the clip. x
- 4th: Add a ‘slide right effect to both ends of the clip
- Once positioned correctly, play around with the 'flip vertically' and 'flip horizontally' buttons in the 'crop and rotate' tab to create the desired effect
Step 8 - audio and voiceovers
- Audio tracks appear below video tracks
- The audio track can be 'split', 'duplicated' and 'deleted', just like the video clips we have just edited
- For this demo, the intro to the track was shortened and the ending was cut so that it fit inline with the length of the video
- Audio volume, the, and channels can be edited under the 'Audio' tab on the right
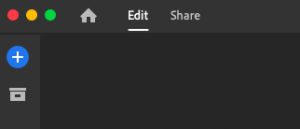
- To add a voice over, find and click the blue 'plus'
 button at the top left, and then click the 'VoiceOver' button
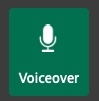
- This adds another audio track; this time with a red 'record'
 button
 - Press this button, wait for the countdown and begin your VoiceOver. Note: Requires a microphone on your computer
- Click the button again to stop recording

- Your VoiceOver track acts exactly like an audio track and cane edited accordingly
Step 9 - export final file
- Once happy with the final video, find and click the 'share' button at the top left, which will open the export settings
- Here you can edit the file name, change the location you want the video to be exported, and change file settings such as resolution, frame rate, audio channels and quality
- When you have selected your export settings, click the blue 'export' button on the bottom right and it will begin exporting your file
- You can find your project file in the location you designated it
- Additionally, you can select a preferred destination on the left, enabling you to post your video to multiple social media platform
Originally developed by Louis Anderson, April 2021