Adobe Audition (Au) - Tutorial 1
Recording and Mixing a Podcast with Music
Difficulty: Easy
What you will learn: Recording in Waveform, noise cancellation, trimming, basic transitions, Multitrack effects
Result: An audio file with background music and a voiceover
What is Adobe Audition?
Adobe Audition is used for recording and mixing audio, such as voiceovers, music, podcasts, or voice analysis.
There are two modes in Audition: Waveform and Multitrack. Raw audio files are revised in waveform, before the user moves into multitrack to mix and edit. Waveform is a destructive editing area: Any changes you make are permanent and cannot be reversed. Multitrack is for mixing audio and is where most of the editing occurs. It is non-destructive, and any changes will not directly affect any files.
NOTE: Interchange Ctrl/Cmd (⌘) depending on your operating system for keyboard shortcuts. Any further differences will be noted. The first screenshot in each set will be on Windows 10, the latter on macOS Big Sur. Click on them to enlarge
Setting Up Your Waveform File
Open Audition on your device. Go File -> New -> Audio File or Ctrl+Shift+N to create a new waveform file with the following settings:
- Name: A short, descriptive name you can easily reference later (eg Introduction Paragraph)
- Sample Rate: 48000Hz
- This depends on the quality of your microphone. Studio microphones can go much higher, but anything lower than 44100Hz will start to degrade your recording
- Higher frequency is used in studios, such as singing. Basic podcasts will be either 44100Hz or 48000Hz
- Channels: Stereo
- Mono channels play equal sound in left/right output. Stereo allows you to adjust L/R levels
- 5.1 is a surround-sound system used in home theatres
- Bit depth: 32 (float)
- For reference, Spotify's free plan is streamed at 32 bits. Audio CDs are played at 16 bits
Recording in Waveform
Once you press OK, you'll reach a screen like this:
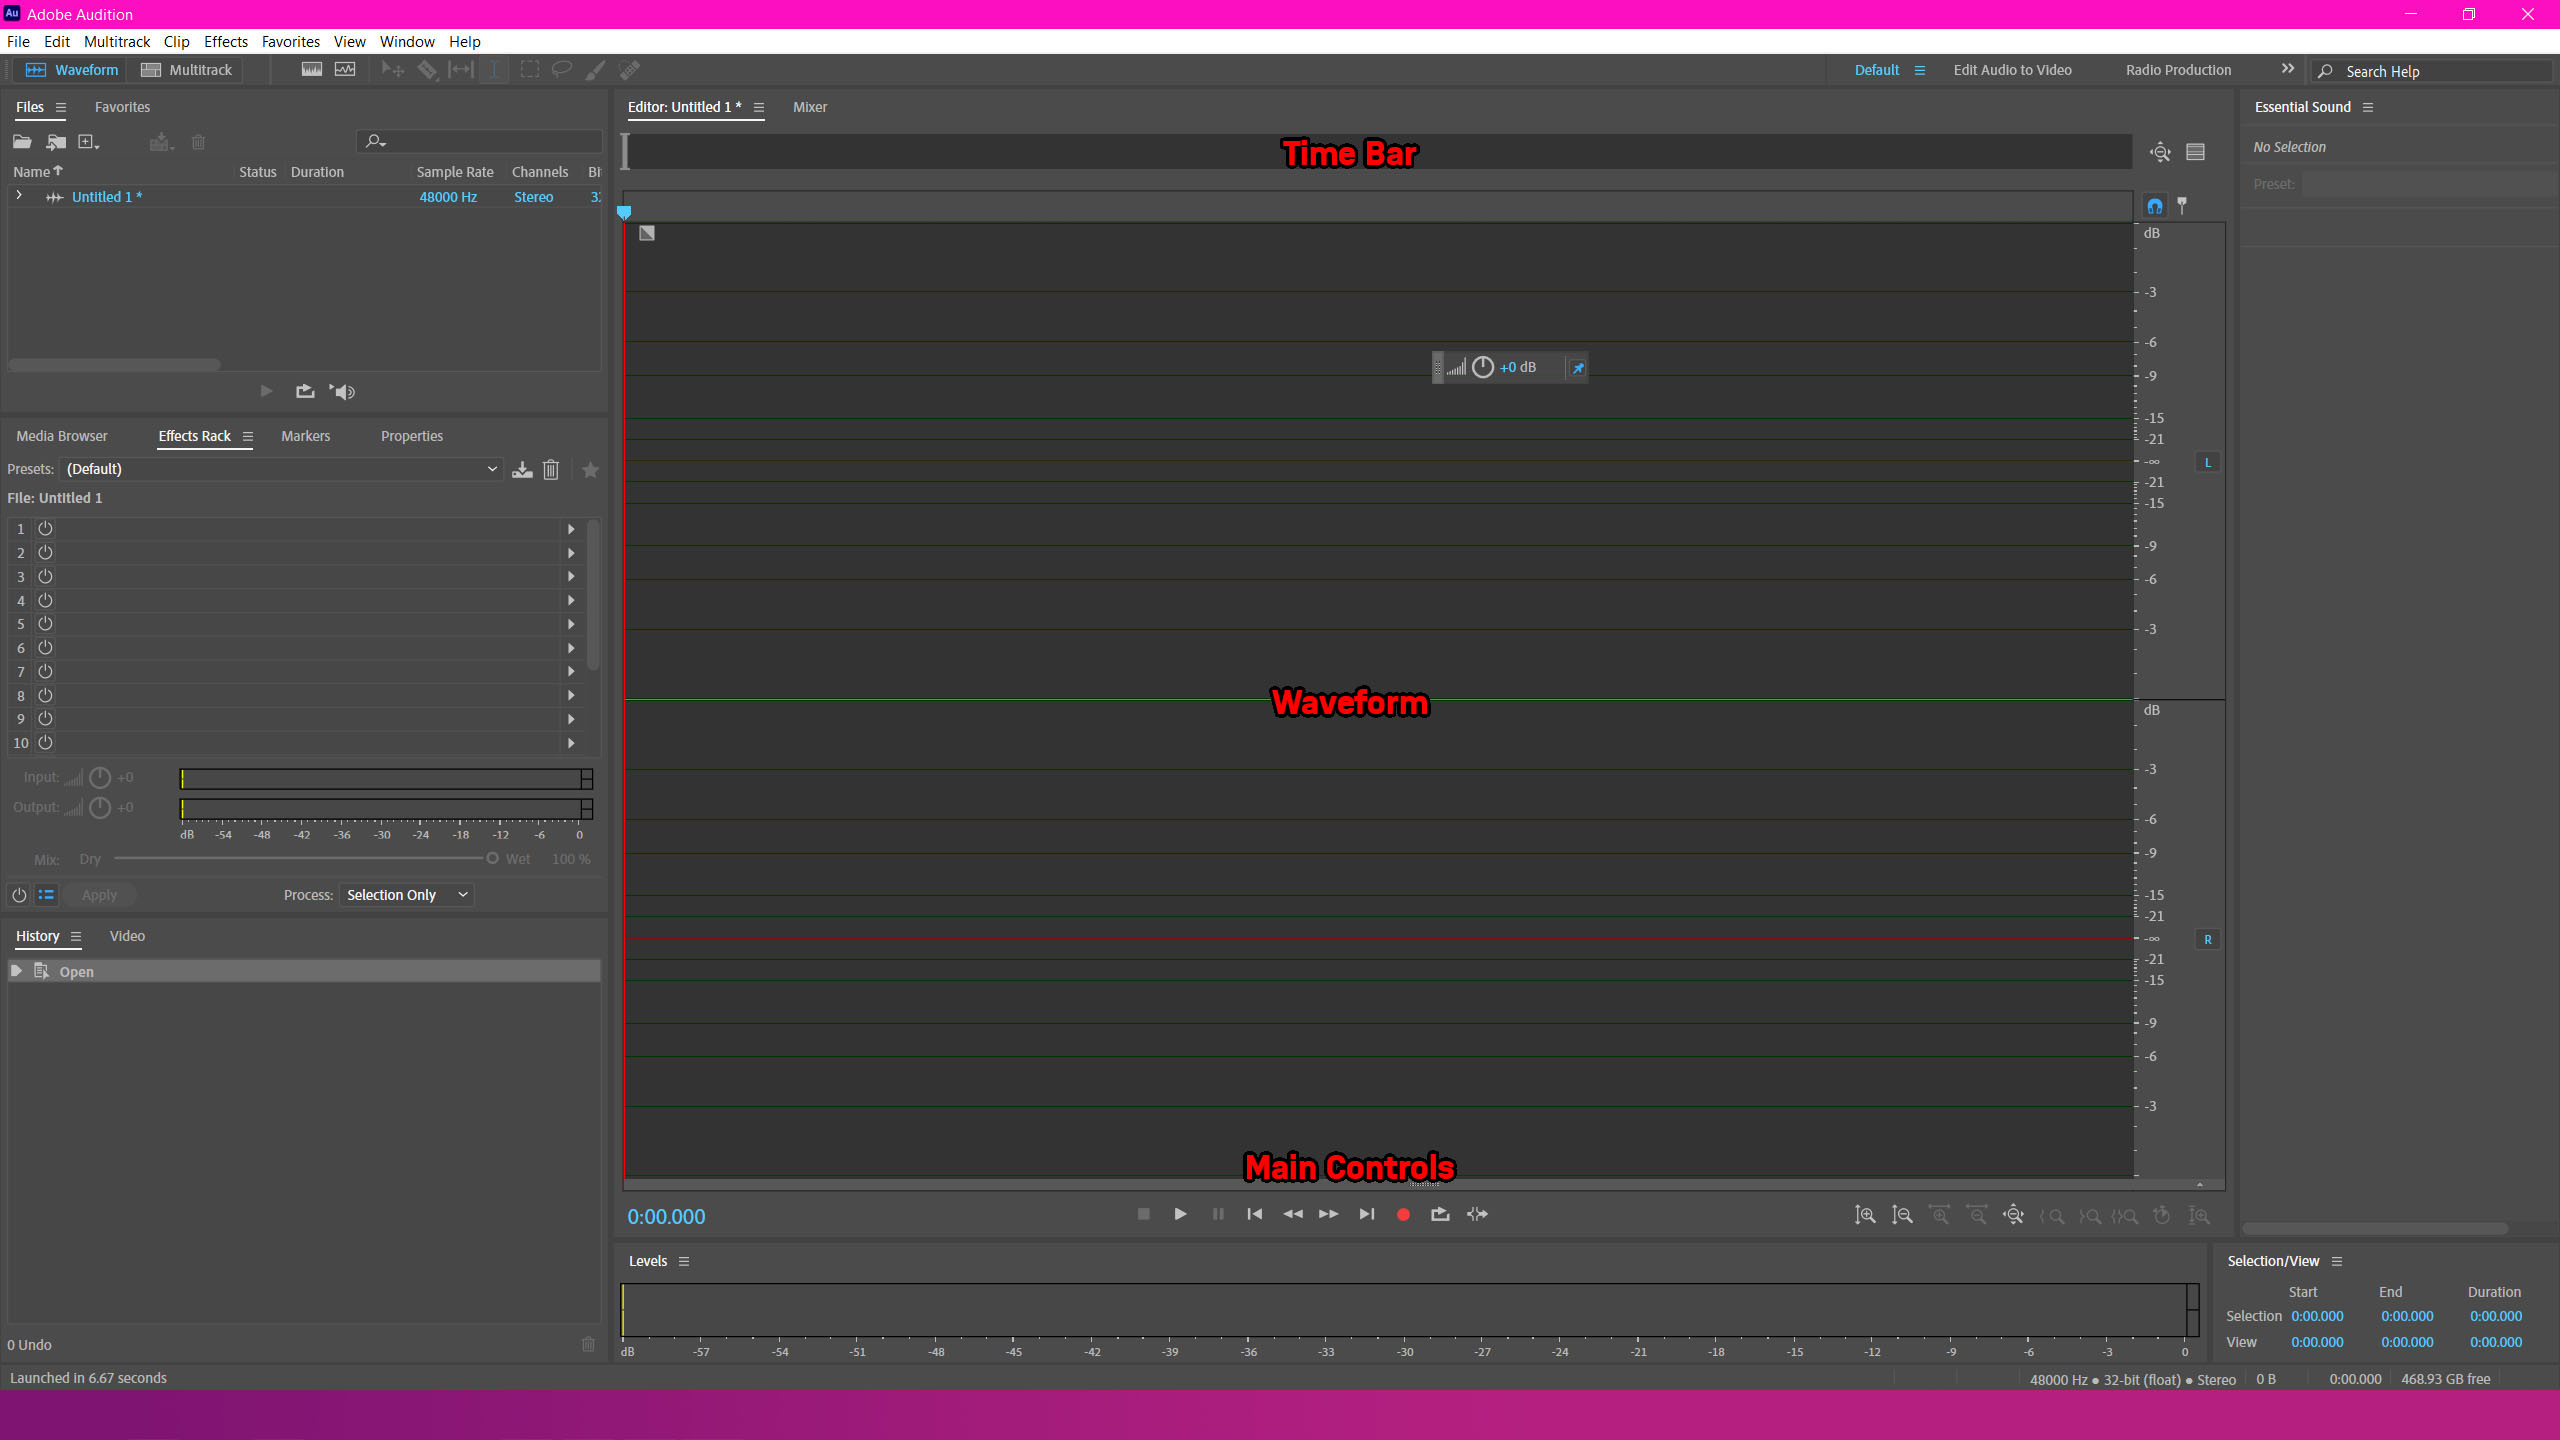
The H:M:S Time Bar at the top is used to navigate your audio. The waveform section visualises your audio for editing. Naturally, the red circle at the bottom-centre of the workspace is to record and stop recording your microphone. Shift+Spacebar starts the recording, and spacebar stops recording.
Tip: When recording, leave 2-3 seconds of silence before and after speaking. The time at the start calibrates your microphone and provides a sample of background noise. The gap at the end helps buffer your recording as Audition tends to cut them short.
To zoom in/out, hover over the H:M:S time bar near the top and scroll up/down over it. You must hover over the time bar to scroll.
To playback what you just recorded, press spacebar to start/stop playback.
To select a sample, click and drag in the main frame. You can use Ctrl+L to loop what you have selected. This is useful when making edits
Noise Fidelity & Reduction/Cancellation
Use Ctrl+A to select all of your recording. Go to Favourites in the top menu and select Normalise to -0.1dB - This amplifies your recording if it's too quiet, and reduces if too loud
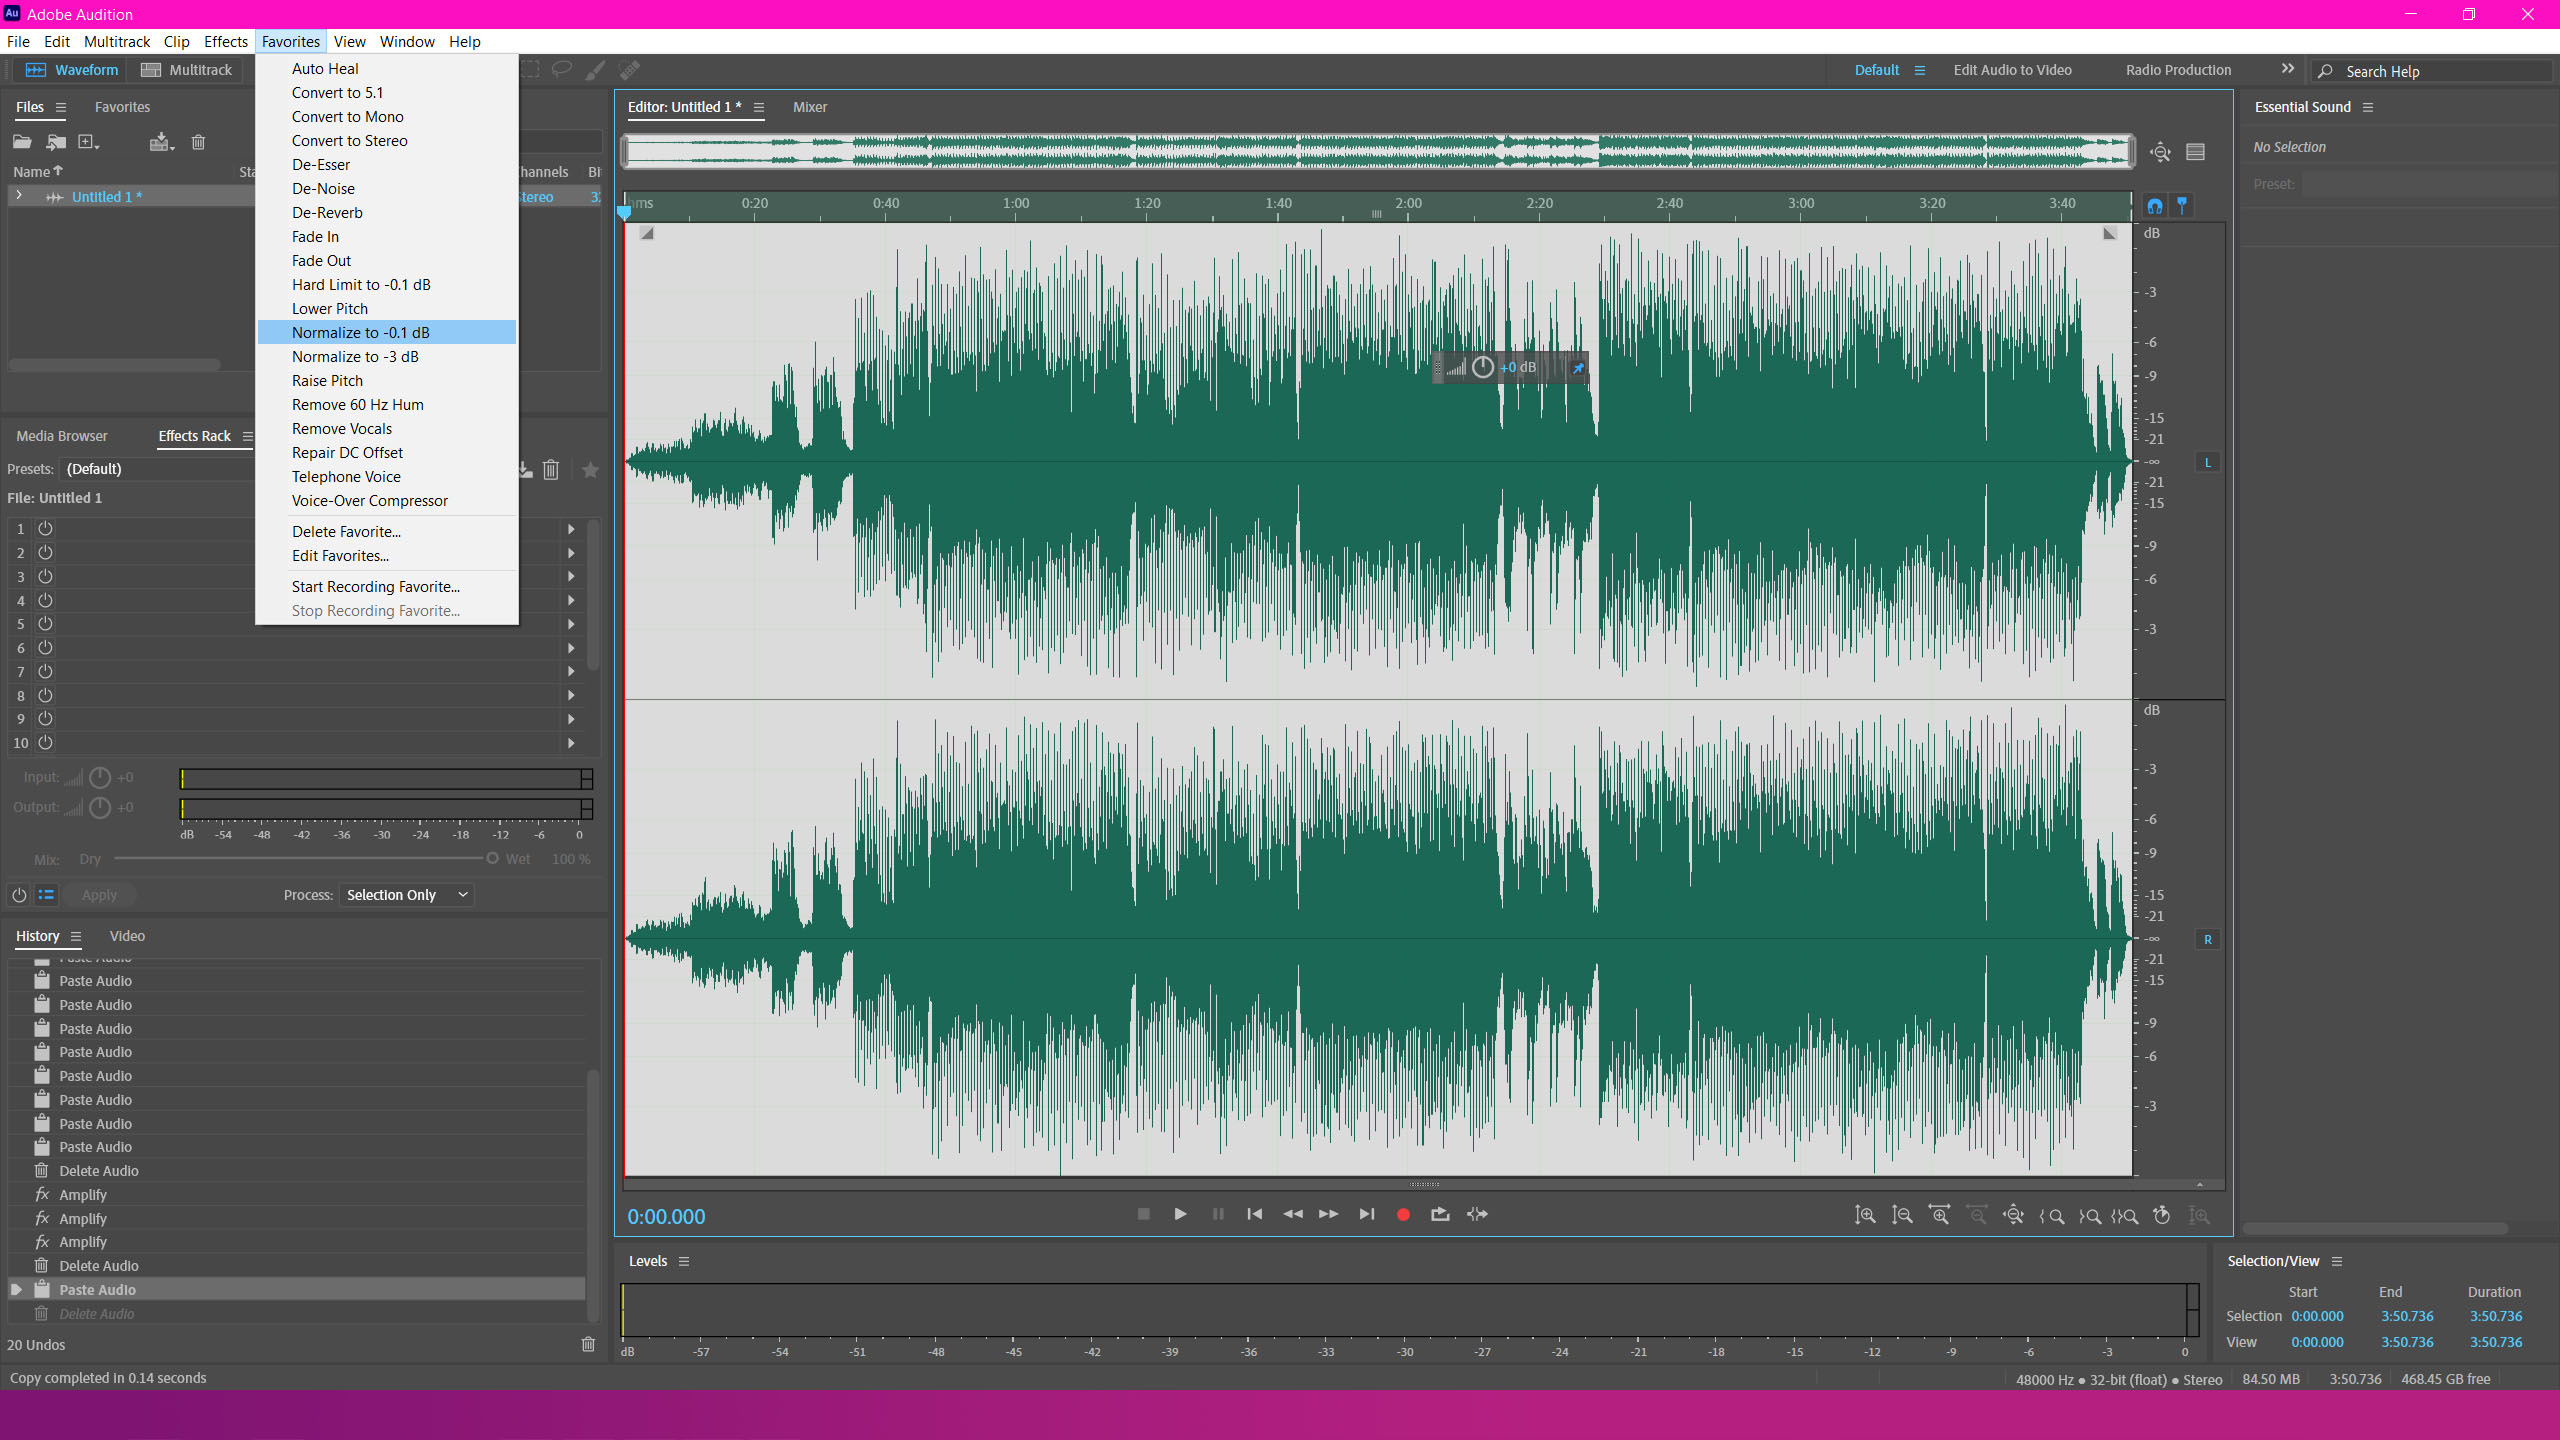
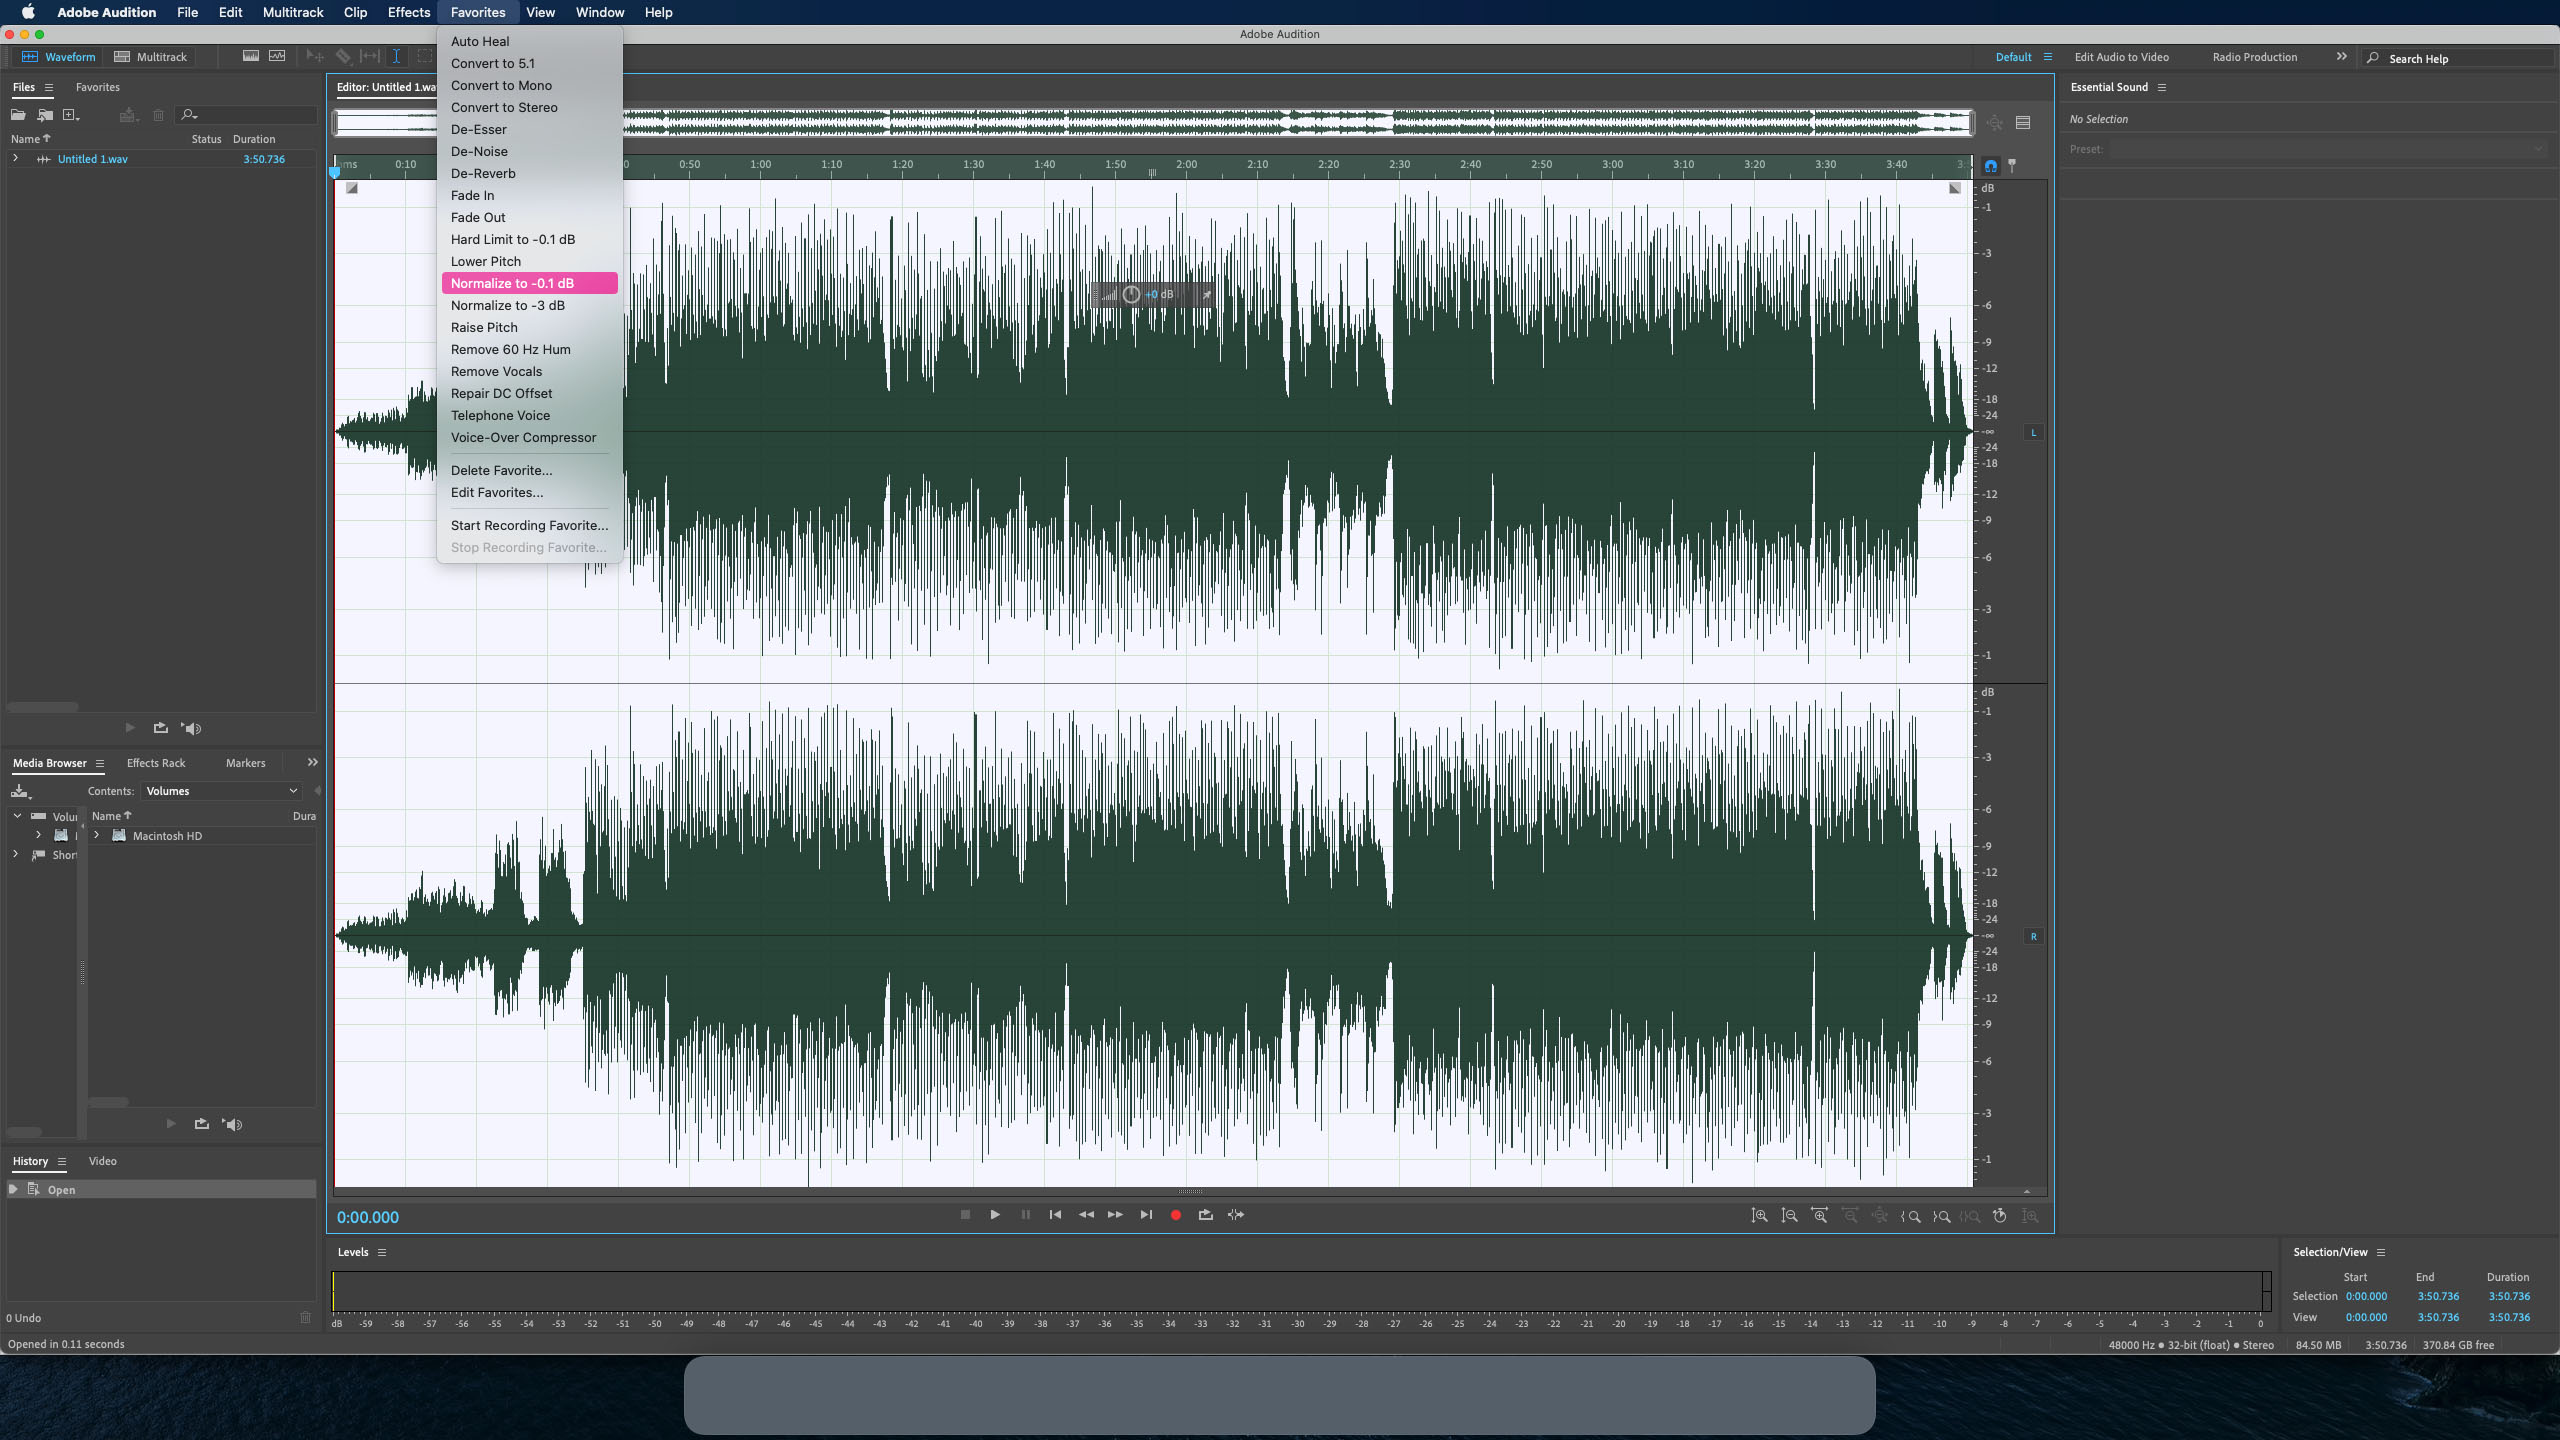
Your audio waveform will automatically adjust in your workspace reflecting these changes
Now that all audio has been normalised, highlight your first 2-3 seconds of audio and press Shift+P to capture a noise print. This is the shortcut for Effects -> Noise Reduction/Restoration -> Capture Noise Print. You'll see a pop-up window - just press OK to close it. Capturing this noise print gives the program a sample of your background noise to remove. It uses this sample to remove background noise from the rest of your recording.
Next, highlight everything (remember Ctrl+A?) and press Ctrl+Shift+P - shortcut for Effects -> Noise Reduction/Restoration -> Noise Reduction (Process) - to open the noise reduction window
Adjust the two sliders using the three buttons in the bottom left to assist you. The interface looks something like this:
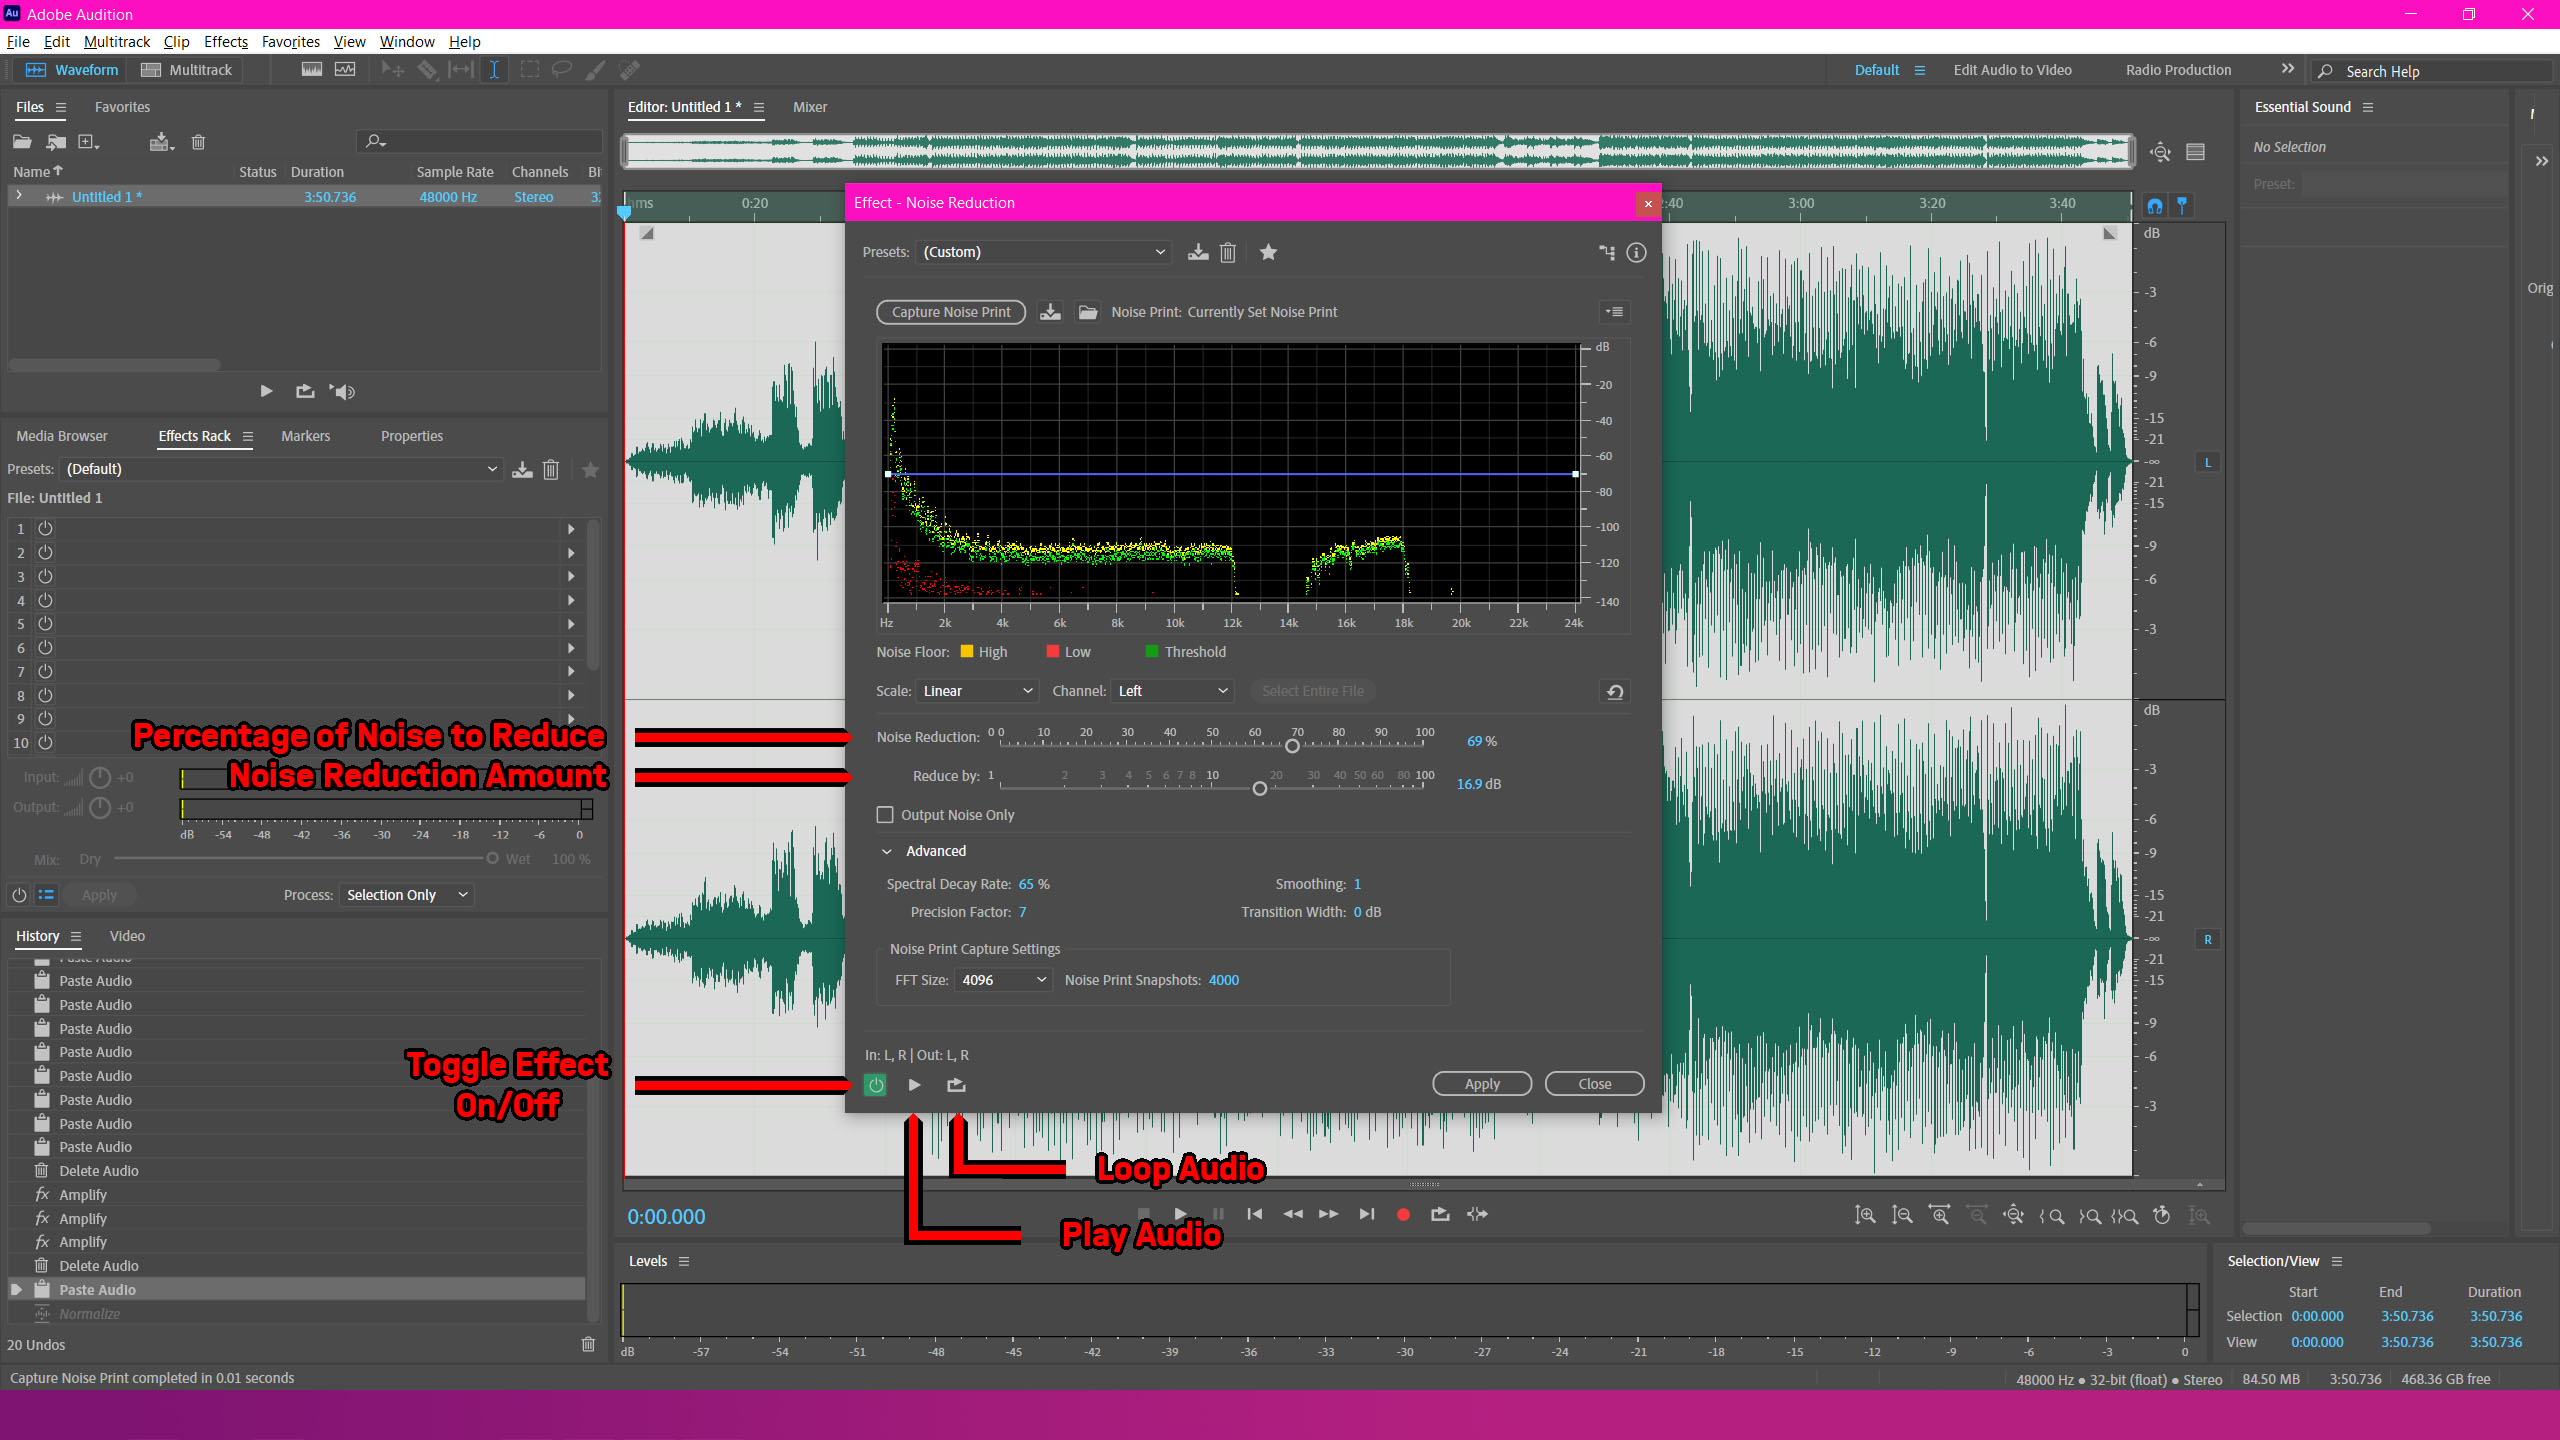
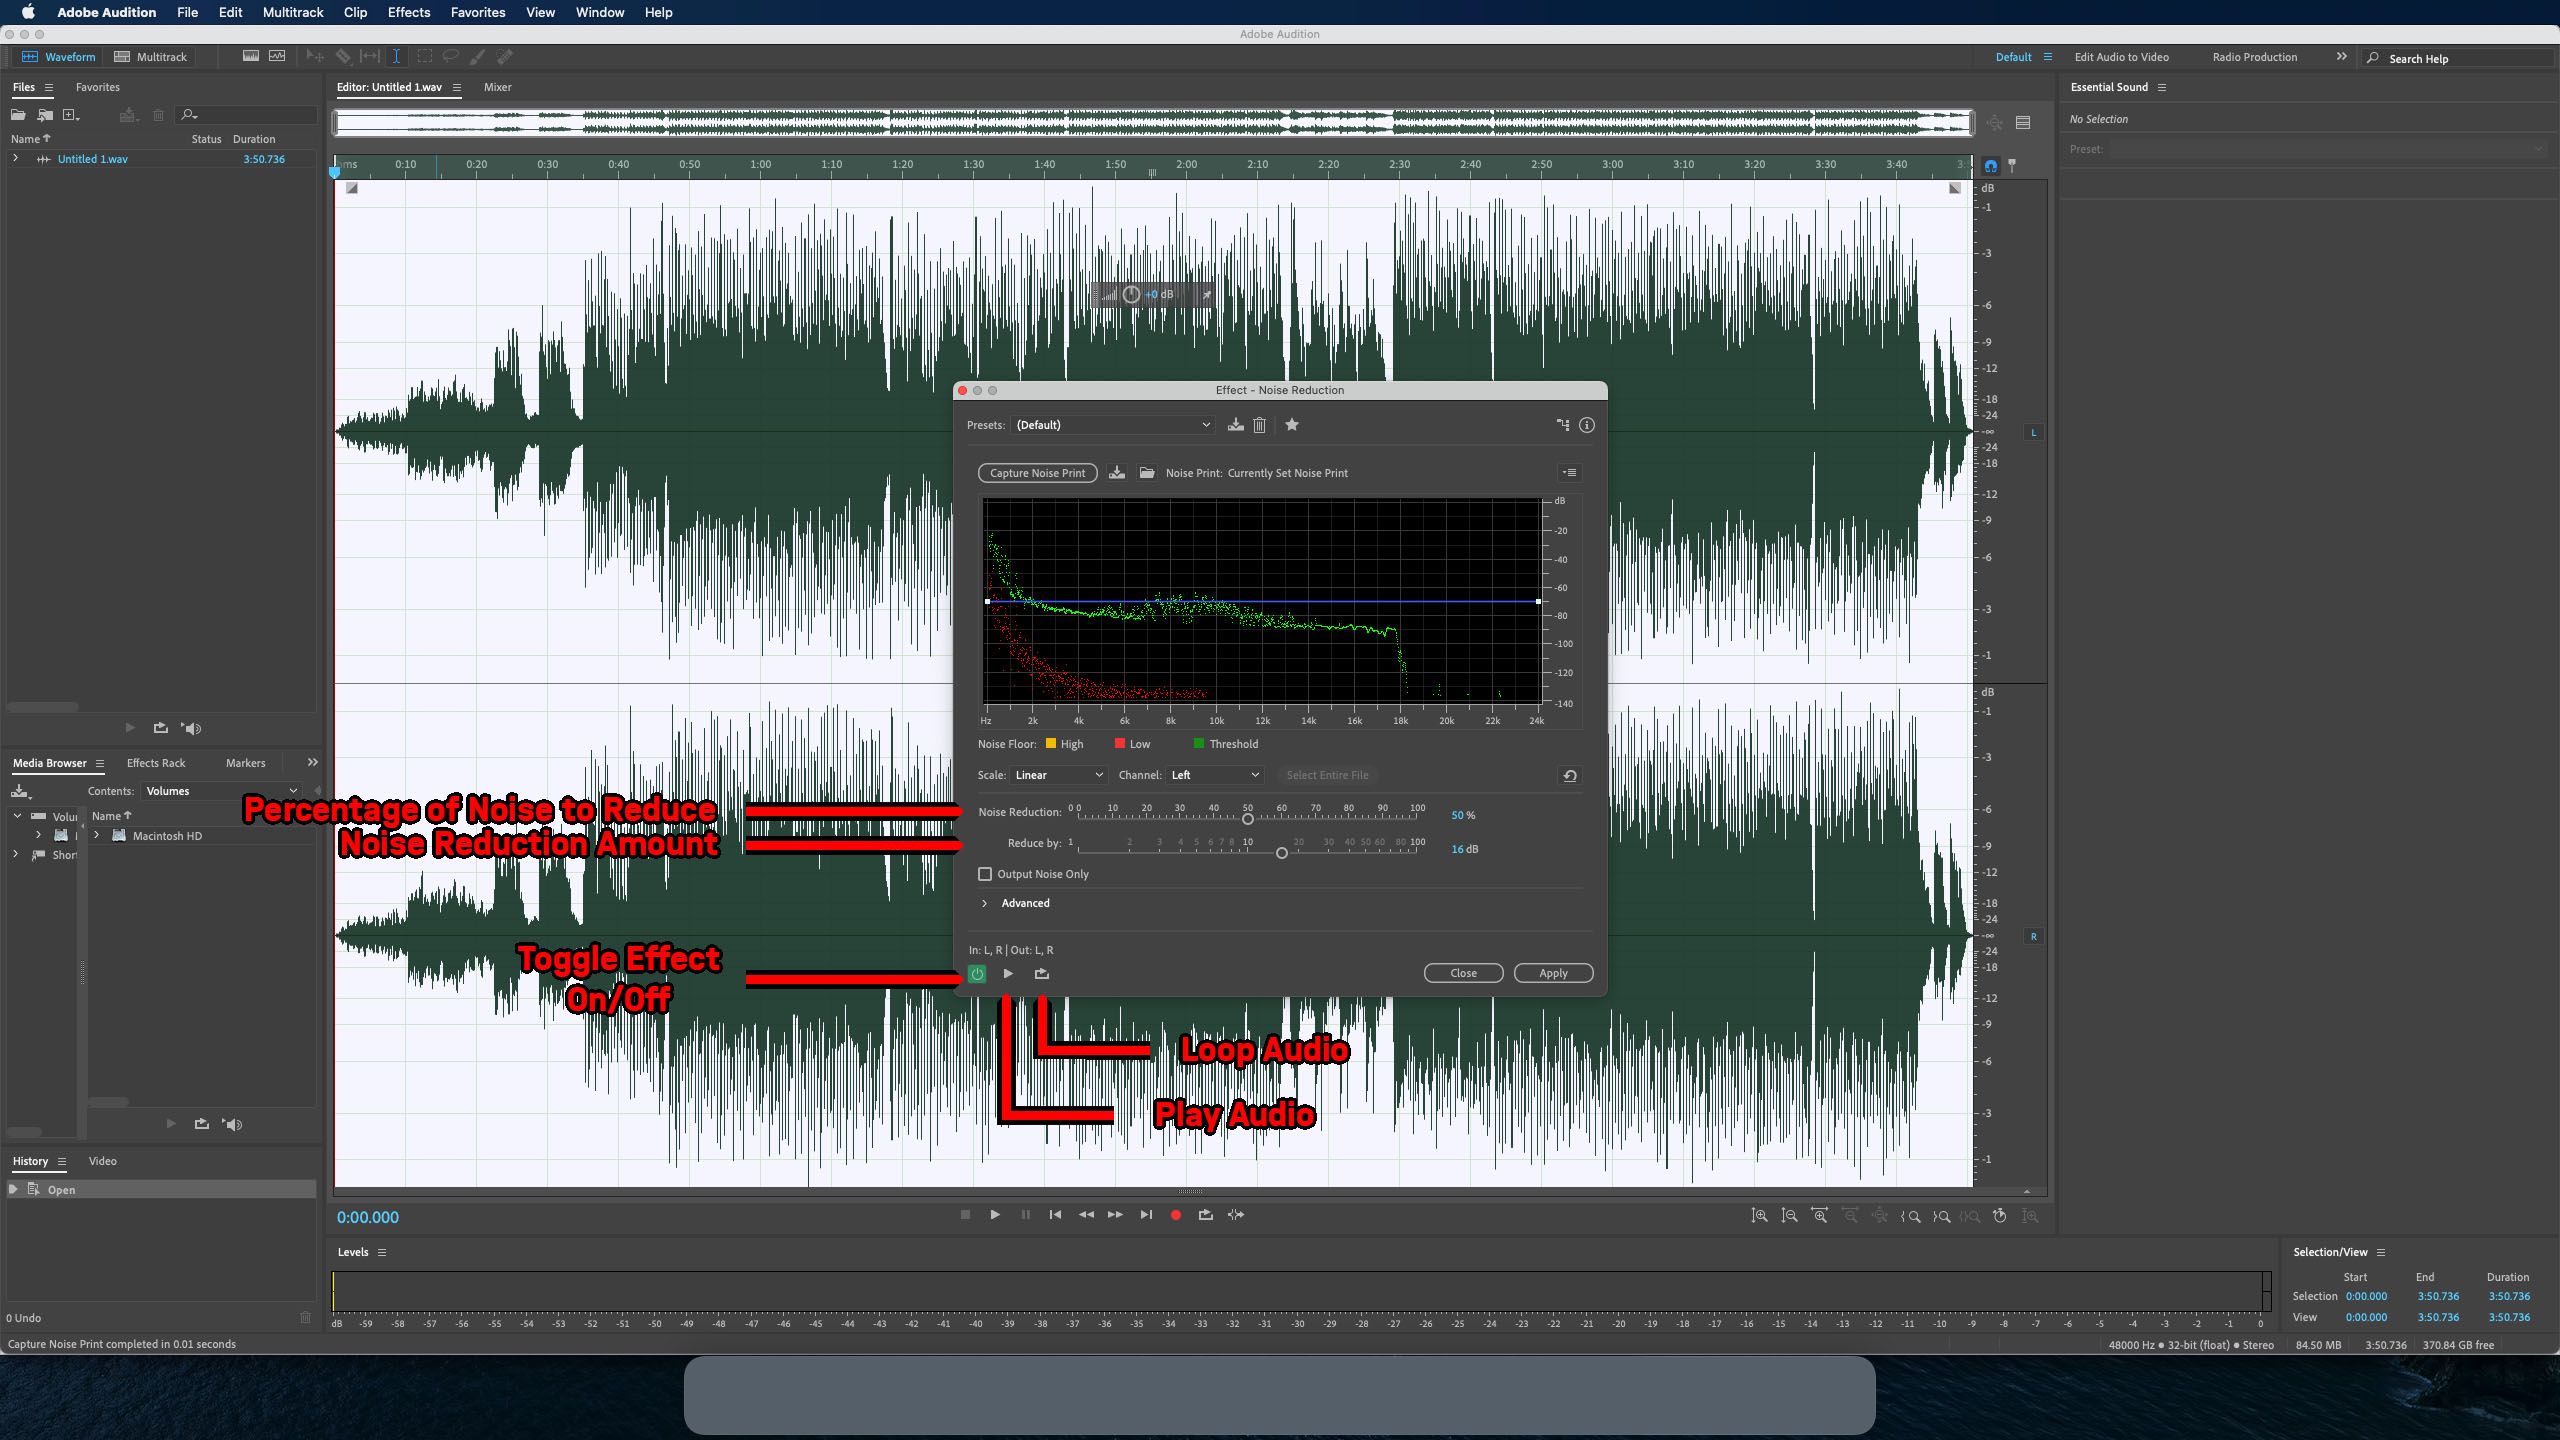
You should aim for a clear, articulated recording of your own voice with little - but never zero - background noise. Having no ambience may sound a little awkward and unnatural. Press Apply to close the window when complete
Saving a Waveform Recording
Now that you've successfully recorded a project in waveform, it's time to save it. Press Ctrl+S to bring up the one-time save menu. It is crucial you save this as your preferred file type as Audition will format the recording as such. You have many options, but the two suggested ones are:
- Wave PCM: Save as this type here. This is a full file and retains size and quality for editing later.
- MP3: Compresses the file (hence reducing quality); never use this before editing unless you are low on storage space. This is suggested for your final save in the last step of this tutorial
Setting Up Your Multitrack Session
Almost identical to the first step, head to File -> New -> Multitrack Session with the following settings:
- Name: This is the name of your project (eg Podcast Assessment)
- Template: None (Best to start from scratch!!)
- Sample Rate: 48000Hz (This must never be lower than an original file)
- Bit depth: 32 (float)
- Master: Stereo (strongly recommended, even for podcasting)
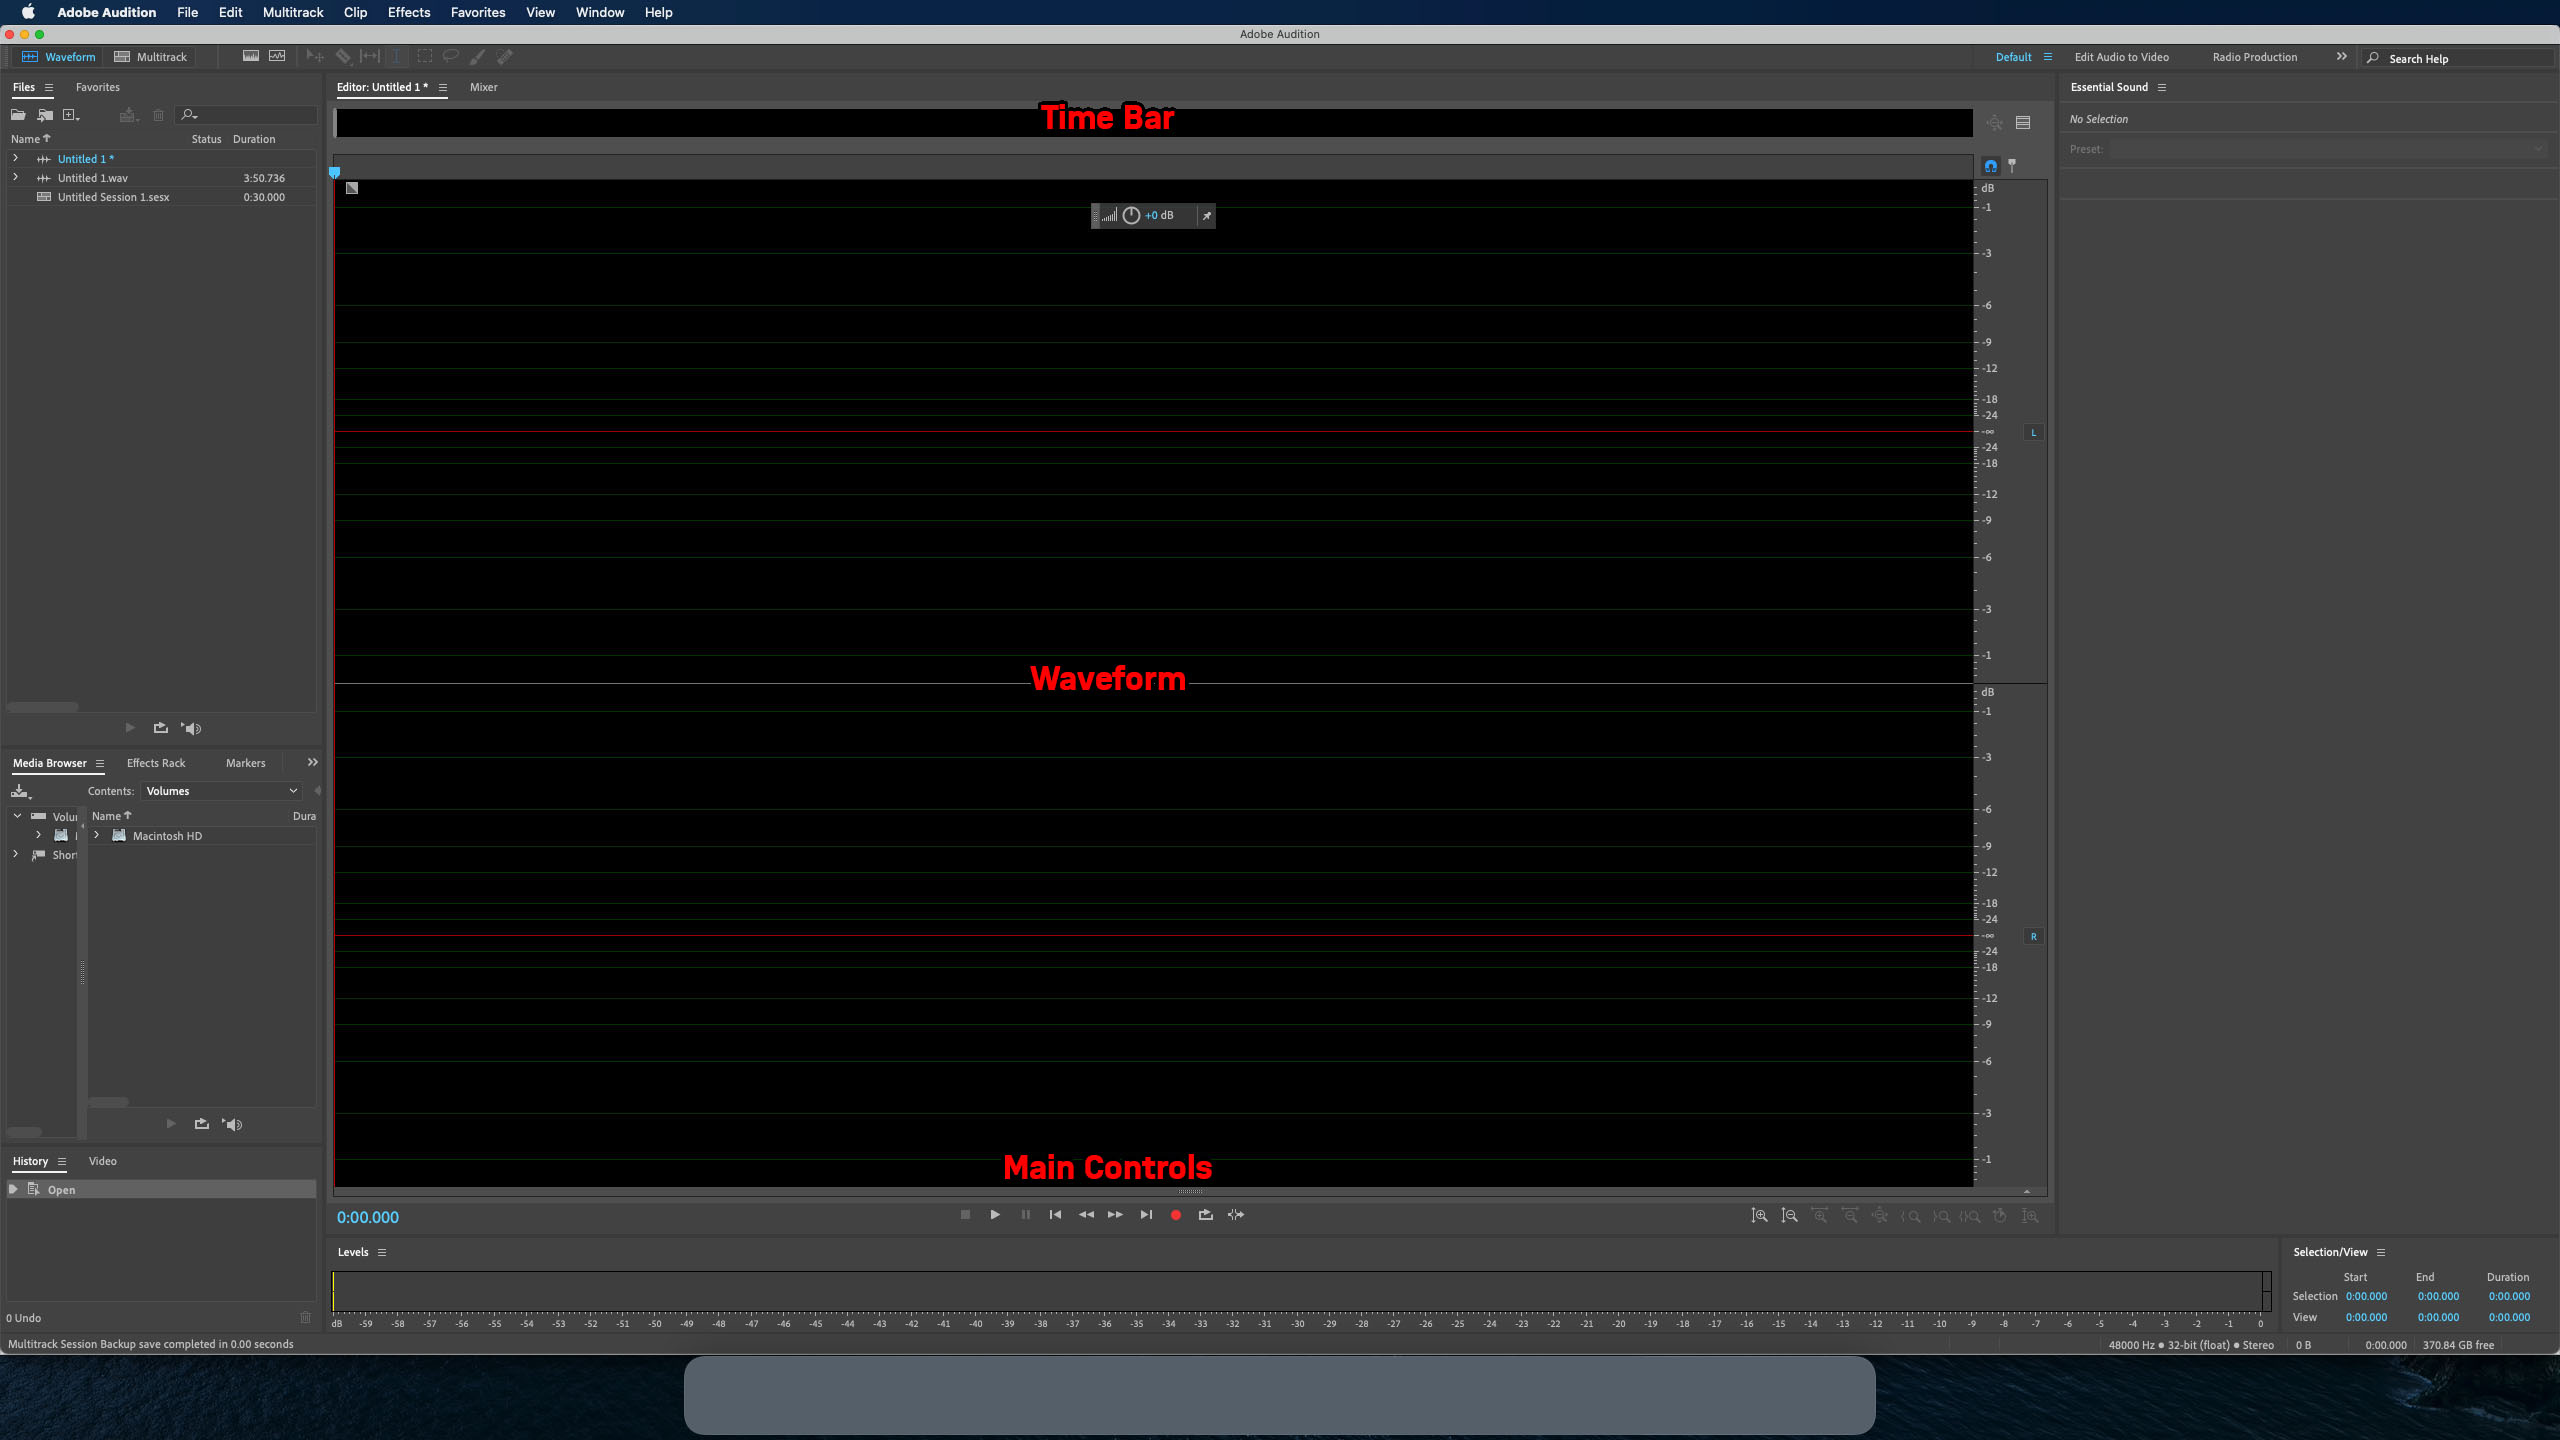
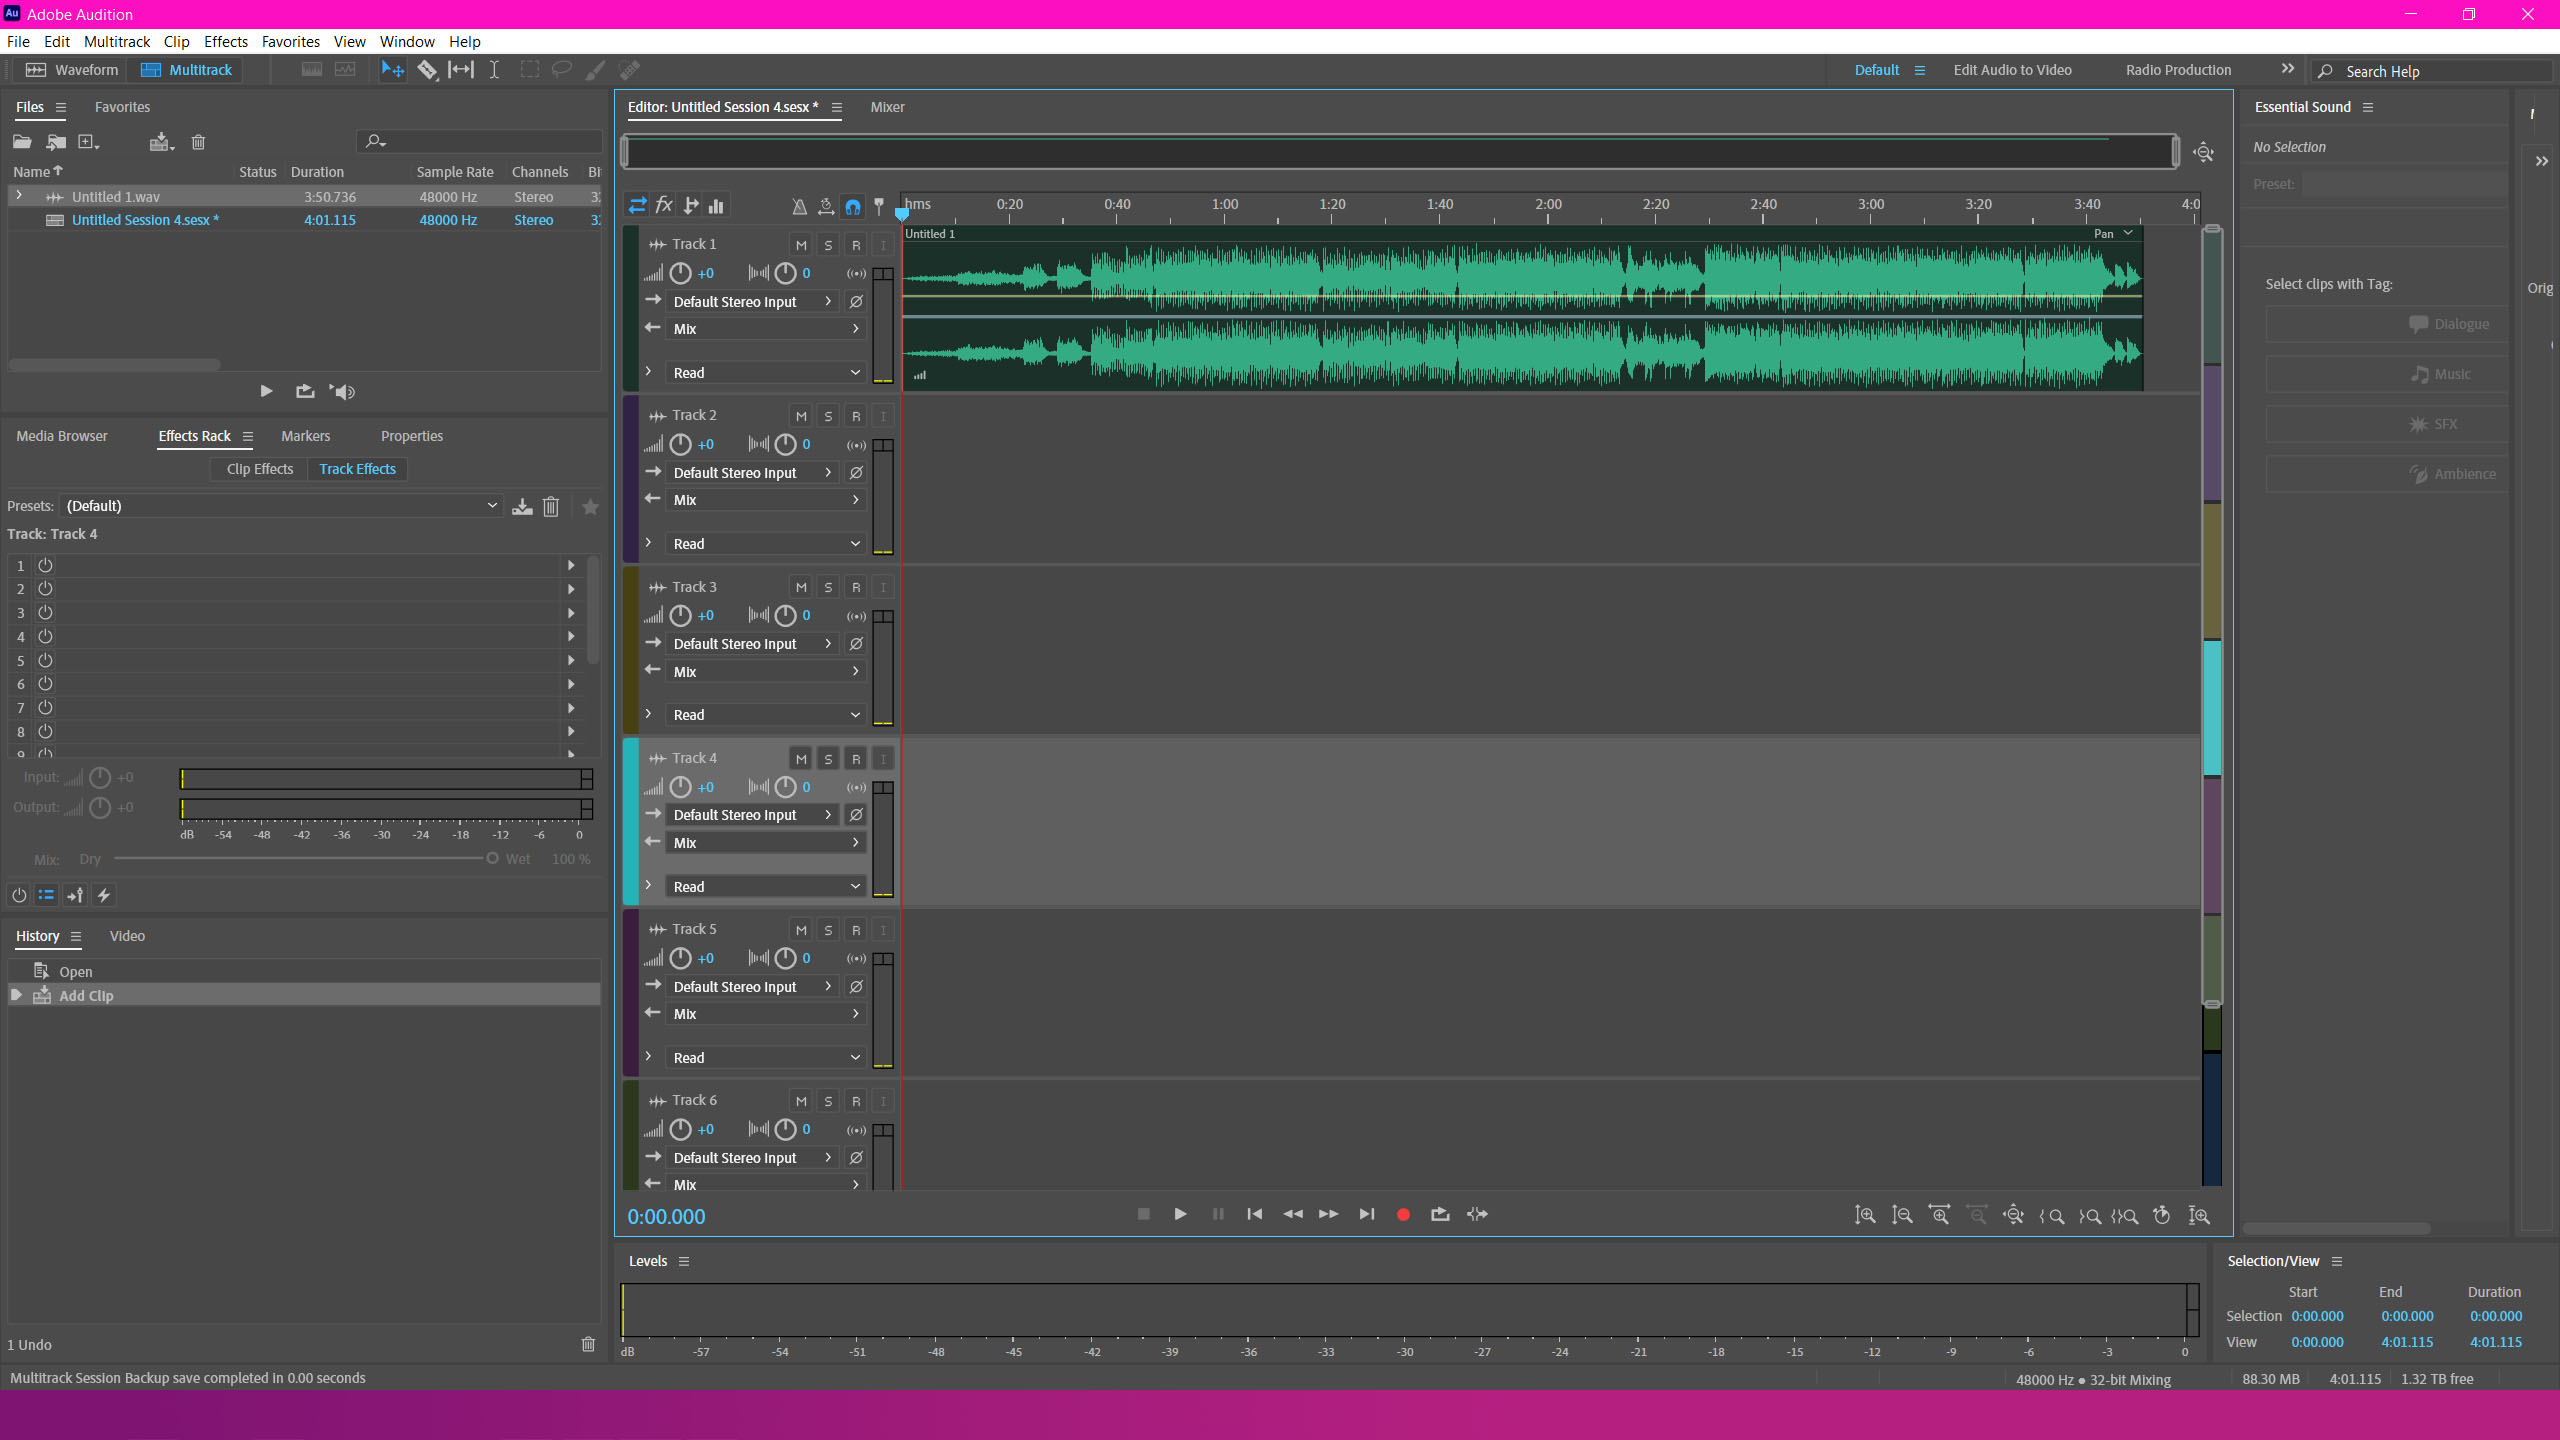
Once it opens, you'll reach this default multitrack workspace:


You can head back into waveform in the top left corner if needed. Your main mixing area consists of 7 tracks - more can be added if needed. The default left panel will have your imported files for the project, a media browser and effects rack, and a history panel. The history panel allows you to undo an unlimited number of actions in your most recent file. It resets each time you close the program.
Importing Waveform into Multitrack
In the top leftmost panel, you will find the waveform file you were editing in your imported files. Drag and drop it into the top track in the mixing area - this is track 1. It'll look like a mini waveform project:

There are two ways to import files you haven't recorded in waveform:
- In the same top-left section, follow the first icon to open files. It will open Windows Explorer or Finder
- Use the media browser (middle-left) to browse for files to import
Once you open files, they will appear in the same panel at the top-left of the default workspace
Voice Compressor
A voice compressor helps articulate and 'pop' your voice. A poor quality microphone can be remedied (to an extent) using a compressor. Usually, a main adjustment is done first (this step), then a minor edit occurs after all background music and effects are put in afterwards.
In the middle-left, you will have the Media Browser tab open by default. Select the Effects Rack tab next to it, then Open Amplitude and Compression -> Single-band Compressor as below:


Ensure you have applied the compressor to the correct track. Make sure you have selected the voice track in the main area before following the above steps. In Effects Rack, it should be labelled as Track 1 - otherwise you'll be adding effects to the wrong track
Once again, use the sliders within the pop-up menu to adjust your compression. It changes for everyone and varies between each track. Use the play and loop functions on the main interface to assist you. You want your voice to be dynamically consistent, mellow, and intelligible, which gives the recording the characteristics of a professional studio microphone.
Close the window when ready
Inserting Background Music
After using Media Browser to import files to the project, you can simply drag and drop them into an empty track. If you have recorded your podcast in multiple sessions, add each of these to a new track (eg. An introduction in the first track, the first paragraph to a second, etc). Now with a voice track (track 1) and a music track (track 2), we can now mix them together
Mixing Between Tracks
Click and drag anywhere inside an audio file within a track to move it along the timeline. Order these to roughly where you want them to be within the project
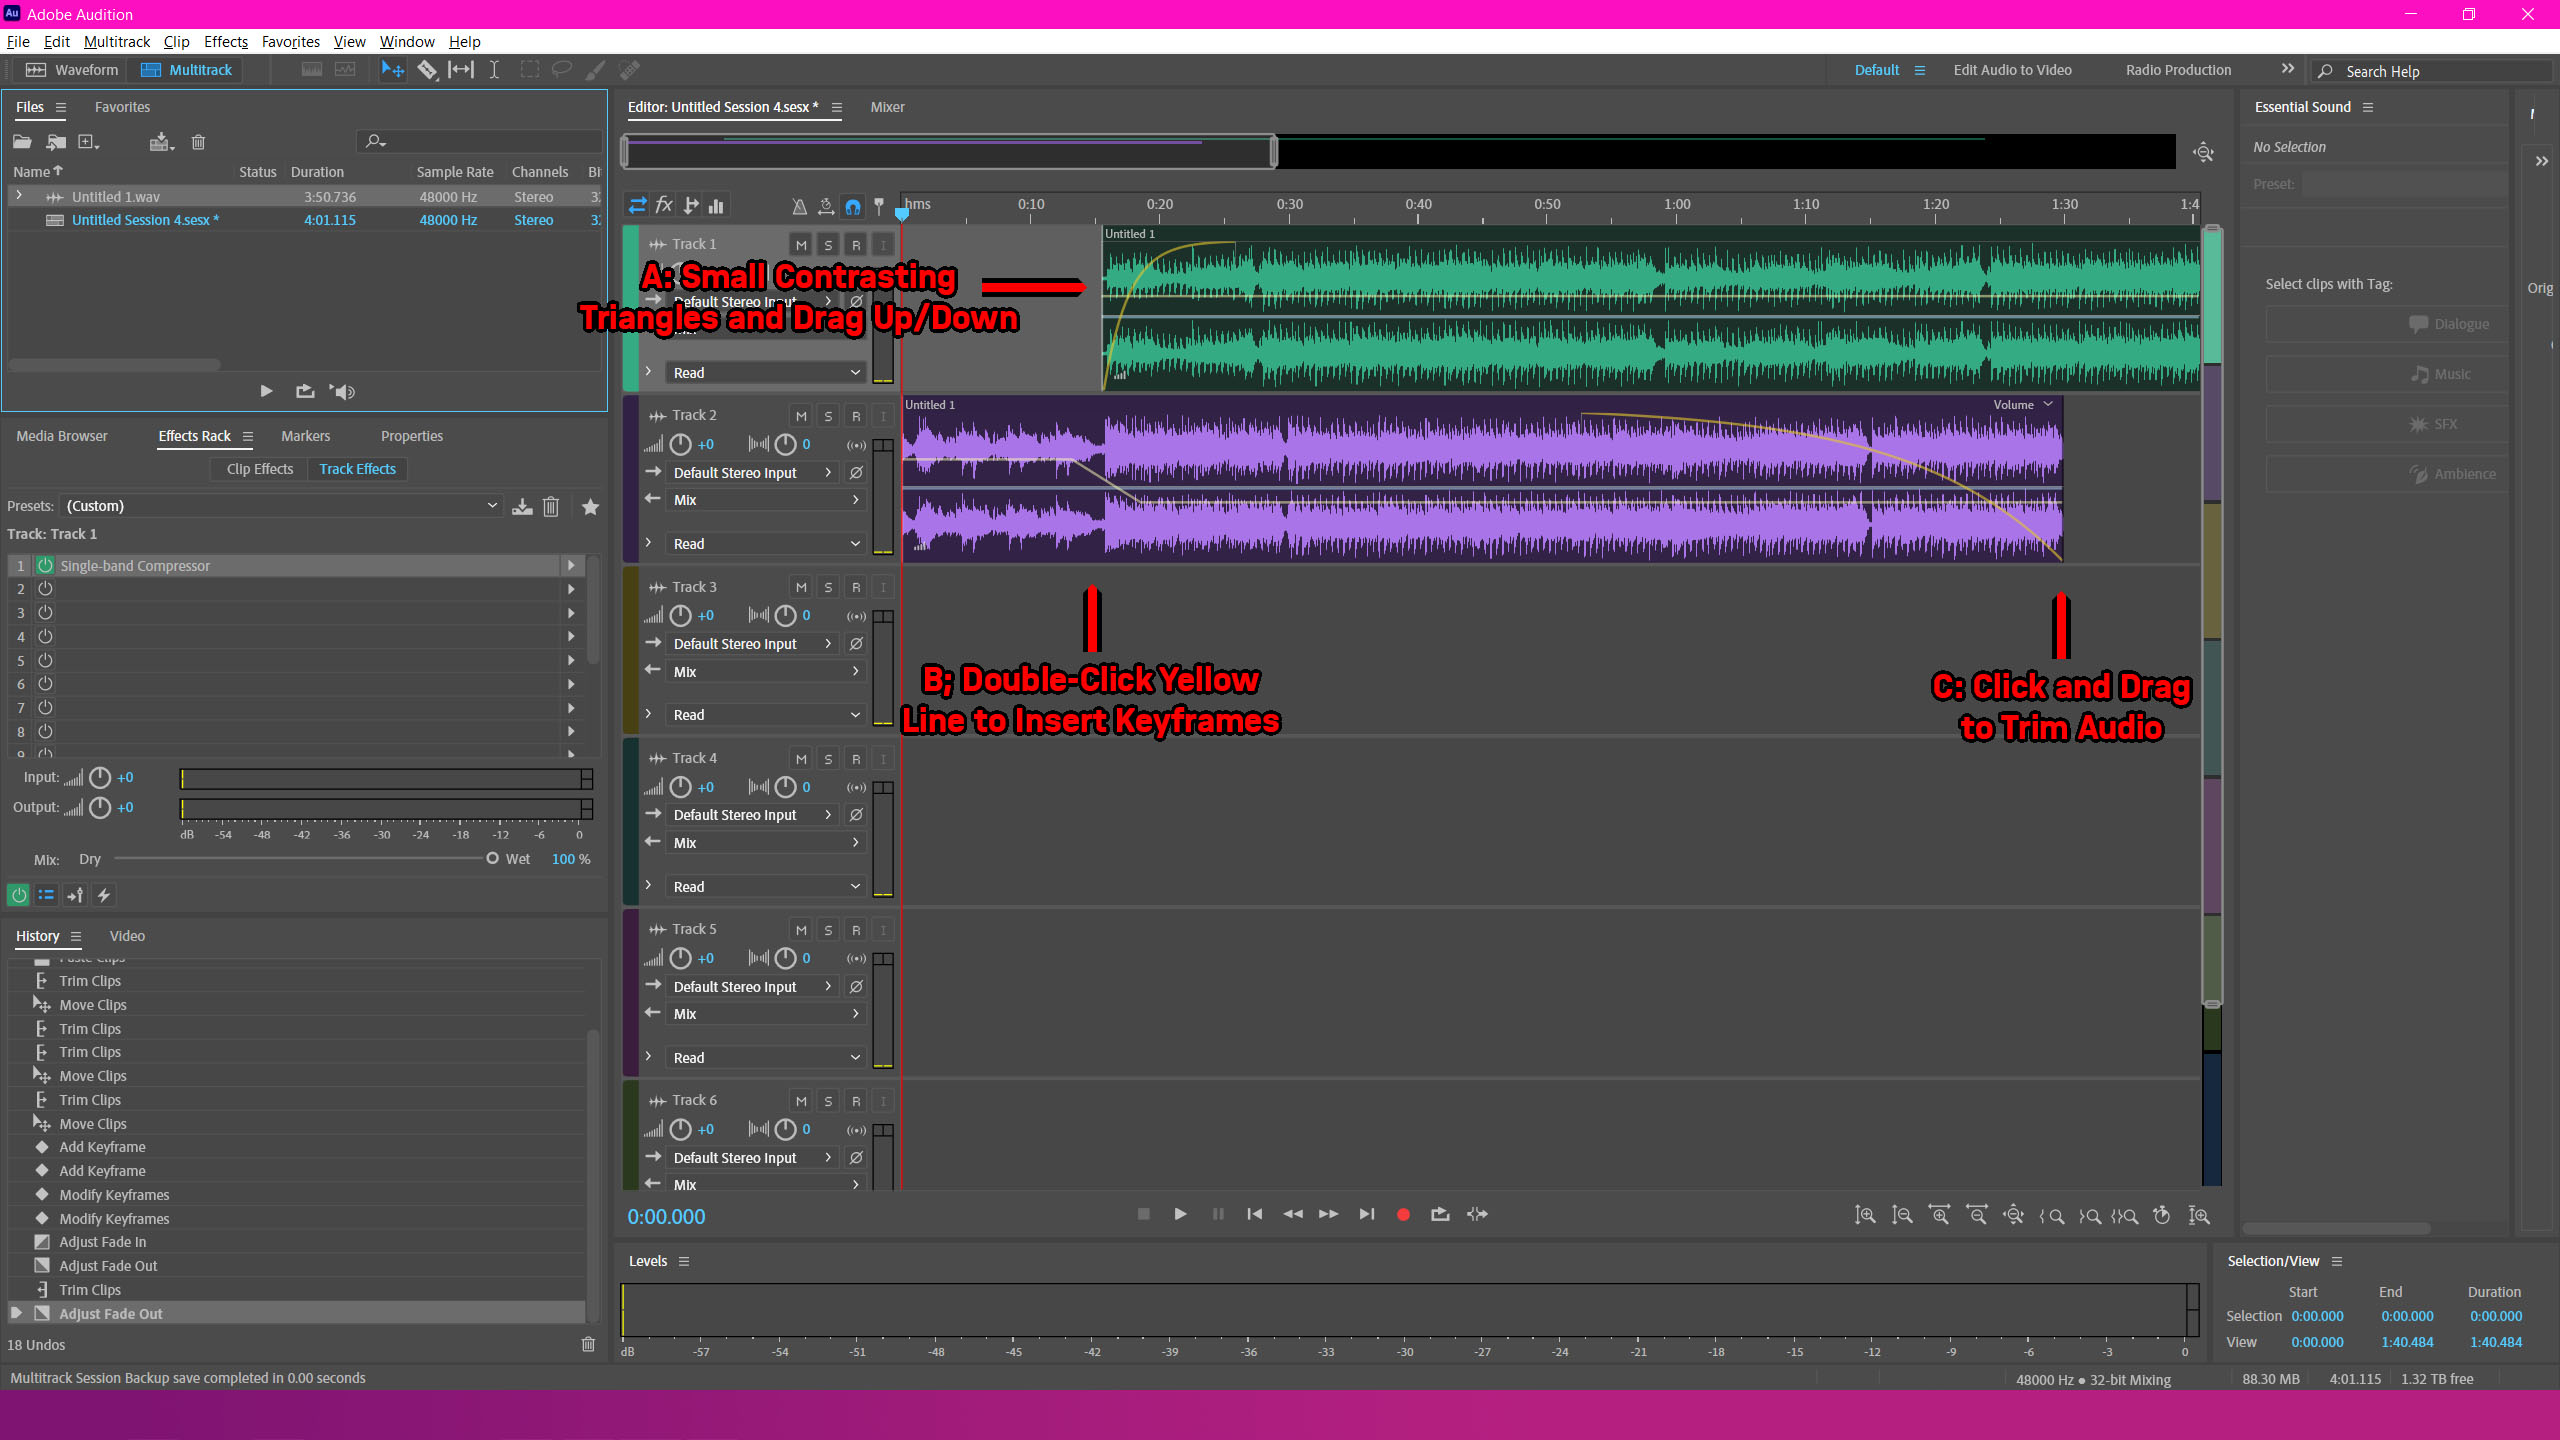
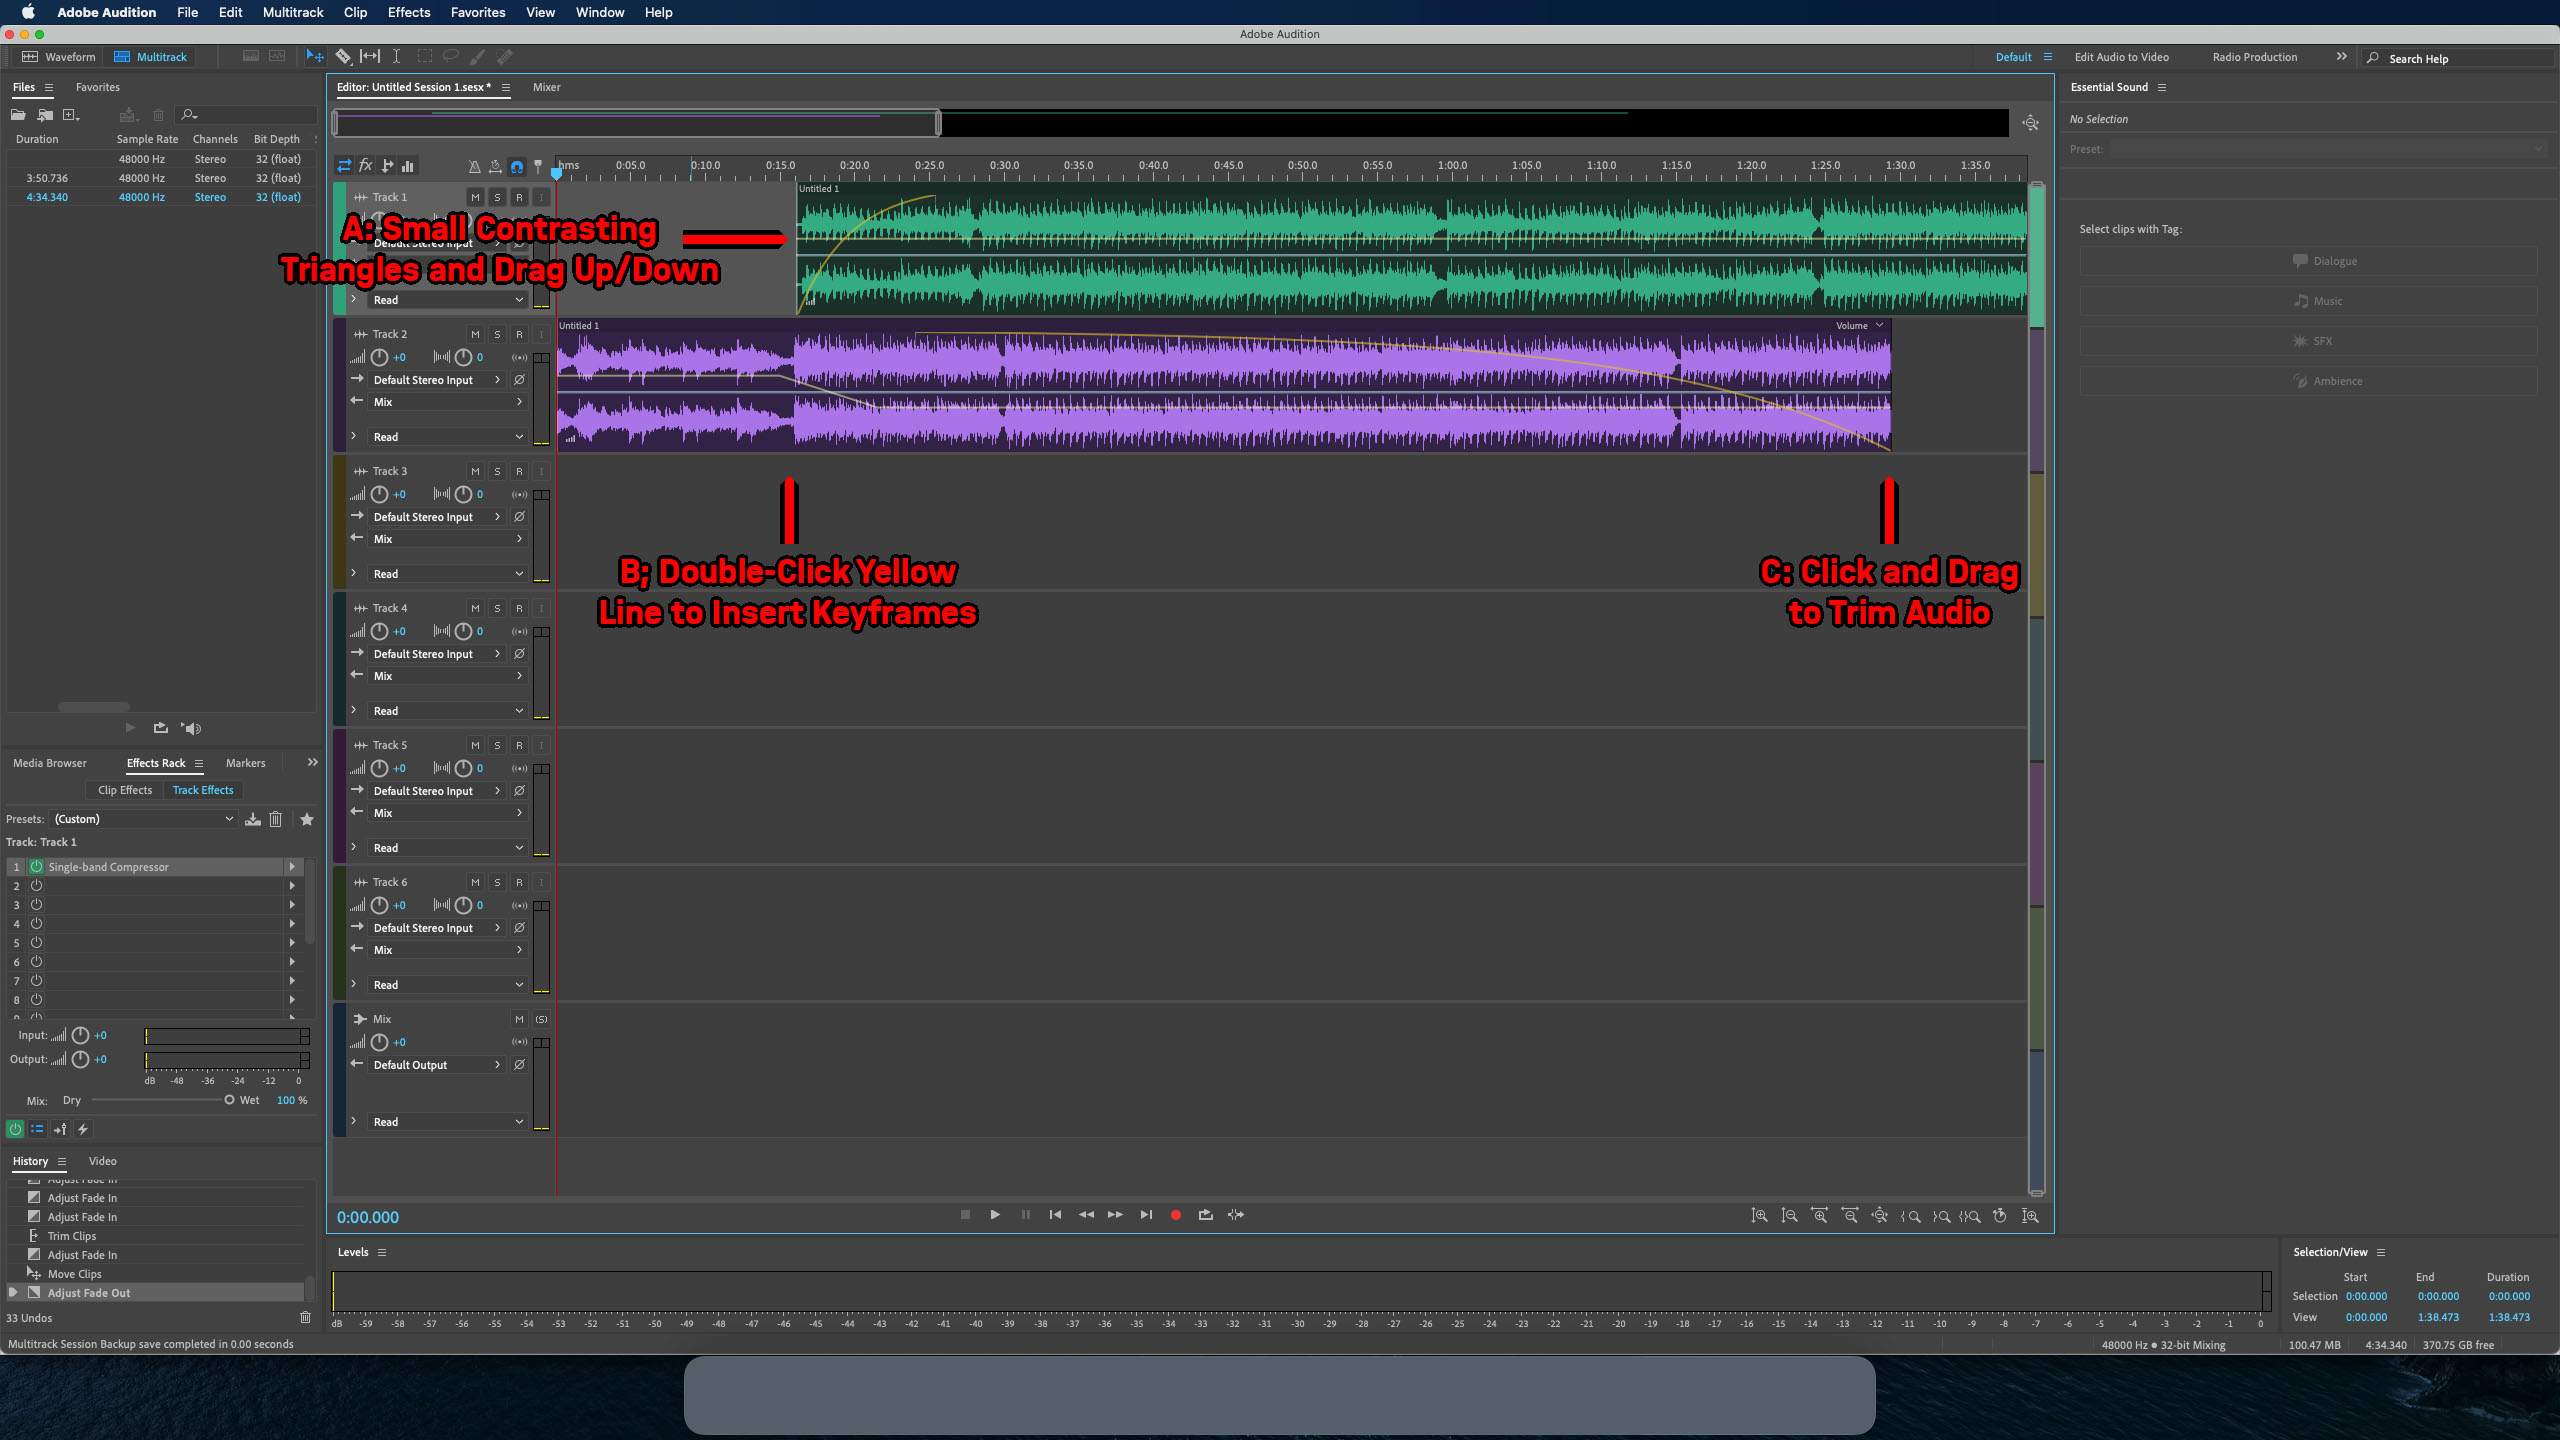
Once that is done, you have three main actions you will want to do:
- Fade In/Out (A): Click anywhere within a track to find small contrasting triangles at the start and end in the top corners. Select them and drag left/right to increase/decrease fade time, and up/down to change the linear angle of the fade
- Volume Adjustment (B): If you have introductory music which you want to fade into background music during your podcast, simply double-click the yellow line (slightly above centre) to create a keyframe. Double-click elsewhere to create another one, and drag this up/down to increase/decrease the volume of the remaining section in that specific track. (Note: To adjust the volume of the full track, do so in the toolbar with the dial under the track name)
- Trim (C): Click and drag on the edge of the track and drag left/right to trim audio
Once the above are completed, you should have an orderly project with transitions, fades, and volume control. Now, if you want, you can return to the voice compressor to make minor changes if needed
Exporting the Multitrack Session
In the top menu, go to Multitrack -> Mixdown Session to New File -> Entire Session to export the full multitrack session back into waveform. You will be taken back to the waveform view
Finally, save the file (Ctrl+S) using the same procedure as the first waveform file. This will export your mix into a new WAV or MP3 file
Originally developed by Benedict, April 2021. Revised in August 2021